Making Your Mixes Sound Better: A Practical Guide to Mixing Foundations

Introduction: Why Mixing Feels Hard at First
Mixing feels difficult in the beginning because you’re trying to balance two worlds at once: the technical side of audio and the emotional side of music. Beginners often jump straight into plugins, thinking the right tool will magically fix everything. It doesn't help that some plugin vendors advertise their products exactly in this way. But the real challenge isn’t the gear or the plugins - it’s learning how to listen with intention. When you’re new, every track feels important, every sound competes for attention, and every move feels like it could make or break the entire song.
On top of that, there’s no obvious “right answer.” Two engineers can mix the same song and end up with completely different results, while both mixes end up sounding great. That ambiguity can feel overwhelming when you’re still learning the fundamentals.
The good news is that mixing becomes dramatically easier once you understand the core building blocks. When you know what to listen for, and in what order, the process stops feeling like guesswork and starts feeling like shaping the story the song is trying to tell. This guide is designed to give you that structure so you can approach your mixes with clarity and confidence.
What a "Good Mix" Actually Means
A good mix isn’t about perfection - it’s about clarity, balance, and emotional impact. When a mix is working, the listener isn’t thinking about EQ curves or compression ratios; they’re simply experiencing the song the way it was meant to be felt. The vocal feels present and expressive; the instruments support each other instead of fighting; nothing distracts from the musical message.
For beginners, it’s easy to confuse “good” with “complicated.” But some of the best‑sounding mixes in the world are surprisingly simple. What makes them great is intention: every element has a purpose, and every decision supports the song.
A good mix guides the listener’s attention, enhances the emotional arc, and translates well across different speakers. If your mix feels clear, balanced, and musical, even before you add any plugins, then you’re on the right track.
The 5 Core Skills Every Beginner Mixer Must Learn
Mixing becomes far less intimidating once you understand the five key skills that shape every mix. These aren’t advanced techniques or secret tricks - they’re the essential building blocks that every engineer relies on, regardless of genre or experience level.
You need to learn how to shape tone with EQ, control movement with compression, create space with reverb, maintain clean signal flow through gain staging, and calibrate your ears using reference tracks. When you understand these five skills, you can approach any mix with confidence because you know what tools to reach for and why you might use them.
Mastering these fundamentals doesn’t just make your mixes better - it makes the entire process more enjoyable. Instead of guessing and getting frustrated, you’re making informed decisions that move the mix forward and help you finish songs with more confidence.
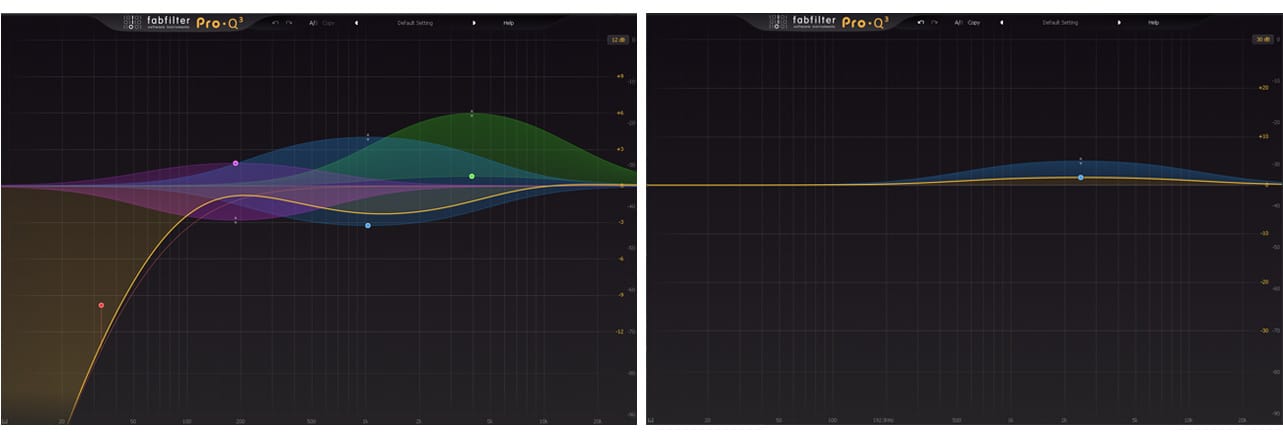
Skill 1 - EQ (Shaping Tone & Removing Mud)
EQ is one of the most powerful tools in mixing because it lets you shape the tone of each track so everything fits together. It is also one of the first tools that beginners reach for. Beginners often reach for EQ to “fix” problems, but its real strength is in creating space in the frequency spectrum. When two instruments fight for the same frequency range, the mix becomes muddy or cluttered. This is like two people with similar voice pitches talking to you at the same time - it gets pretty hard to hear what each of them is saying. EQ helps you carve out room so each element can be heard clearly.
Start with subtractive EQ- it's the cleanest way to open up space in the mix. The goal is to remove unwanted frequencies before boosting anything. Cutting mud around 200–400 Hz, taming harshness around 2–5 kHz, or rolling off unnecessary low end can instantly clean up a mix. Think of EQ as sculpting: you’re shaping the sound so it sits naturally with everything else.
The goal isn’t to make each track sound perfect on its own — it’s to make the mix sound cohesive. That part matters more than most beginners realize.
Skill 2 - Compression (Controlling and
Enhancing Dynamics)
Compression controls the dynamic movement of a sound - how loud or soft it gets over time. Beginners often think compression is about making things louder, but its real purpose is consistency. A vocal that jumps in and out of the mix becomes distracting. Imagine if a lead singer was jumping from the front of the stage to behind the drums erratically - that would just be weird. A snare that’s too spiky can feel disconnected. Compression smooths these inconsistencies so the performance feels more intentional. It's like keeping that lead singer in the right spot on the stage.
Start with gentle settings: low ratios, moderate attack and release, and just a few dB of gain reduction. Listen for how the compressor affects the groove and energy. When used well, compression adds punch, stability, and presence without calling attention to itself.
Think of compression as guiding the performance, not flattening it.
Skill 3 - Gain Staging (Clean Signal Flow)
Gain staging is the process of managing levels throughout your signal chain so nothing clips, distorts, or becomes too quiet to work with. It is also about hitting each plugin closer to its sweet spot. This is one of the most overlooked skills in mixing, but it affects everything: headroom, clarity, plugin behavior, and overall mix quality.
Headroom is the amount of 'volume' we have between the louder parts of the track and digital ceiling of 0.0 dB. The more headroom we have, the more freedom we have to make adjustments in the mix, kind of like having more room to move around in a larger space compared to being cramped with nowhere to go.
A clean gain structure ensures that your plugins operate in their optimal range and that your mix bus has enough headroom for processing. Aim to keep individual tracks around –12 to –18 dBFS on average before processing. This gives you plenty of room to work without running into digital distortion.
Good gain staging makes the entire mix feel more controlled, more consistent, and far easier to shape. It also gives you the freedom to make better adjustments without trapping yourself.
Skill 4 - Reverb (Creating Depth)
Reverb creates a sense of space - the feeling that your mix exists in a real environment rather than a dry, isolated room. Beginners often overuse reverb, which can make the mix feel washed out or distant. When that happens, all of the tracks kind of blend into one another and instrument clarity is lost. The key is subtlety and intention.
Use reverb to place elements in the mix: a short room reverb can add presence to drums, a plate can give vocals a smooth tail, and a hall can add width and depth to pads or strings. The goal isn’t to drown the mix reverb, but rather to create a sense of depth and dimension that supports the song while improving the listener's experience.

When used tastefully, reverb helps the mix feel alive and emotionally engaging.
Skill 5 - Reference Tracks (Calibrating Your Ears)
For someone that is starting out, reference tracks are one of the fastest ways to improve your mixes because they give you a real‑world benchmark. When you compare your mix to a professionally finished track, you might instantly hear differences in tone, balance, depth, and loudness.
Choose references that match the style and energy of your song. Level‑match them to your mix so you’re comparing fairly. Then listen for broad characteristics: how loud the vocal sits, how the low end feels, how bright the mix is, and how much space the reverb creates.
References aren’t something to copy — they’re a guide to help you make informed decisions.
The Most Common Beginner Mixing Problems
Most beginner mixes struggle with the same issues: too much low‑end buildup, harsh highs, inconsistent vocals, over‑processed tracks, and a lack of depth or cohesion. These problems usually come from skipping foundational steps, like setting levels first, or from relying too heavily on plugins to fix issues that are really balance problems.
Another common mistake is mixing too loud. If the overall working volume is hitting your ears too loudly then your ears get fatigued. When that happens, everything sounds dull, and you start making aggressive moves that hurt the mix. This is fast way to start second-guessing yourself. Maybe you were working hard on a mix one day and thought it sounded good only to come back to it on the next day and it sounded out of whack. Keeping your monitoring level consistent and moderate helps you make better decisions and avoid ear fatigue.
Understanding these common pitfalls helps you build better habits from the start.
A Simple Beginner Mixing Workflow
Let's face it - mixing can feel overwhelming when you’re first starting out. I remember when I started out and got really frustrated when I couldn't get the ideas in my head to work properly in the mix. I dropped in some plugins and turned some knobs only to have a constant battle between different tracks, and the song still didn't come together. Maybe you've felt that way, too.
With time, every engineer eventually develops their own mixing workflow, but beginners need something simple, predictable, and repeatable - a process that helps them complete their mixes without getting lost in endless tweaking. This workflow isn’t meant to be the “one true way” to mix; it’s a clear starting point that helps you understand how each stage affects the next, and that is exactly the kind of thing that moved me from frustration to success in my mixes.
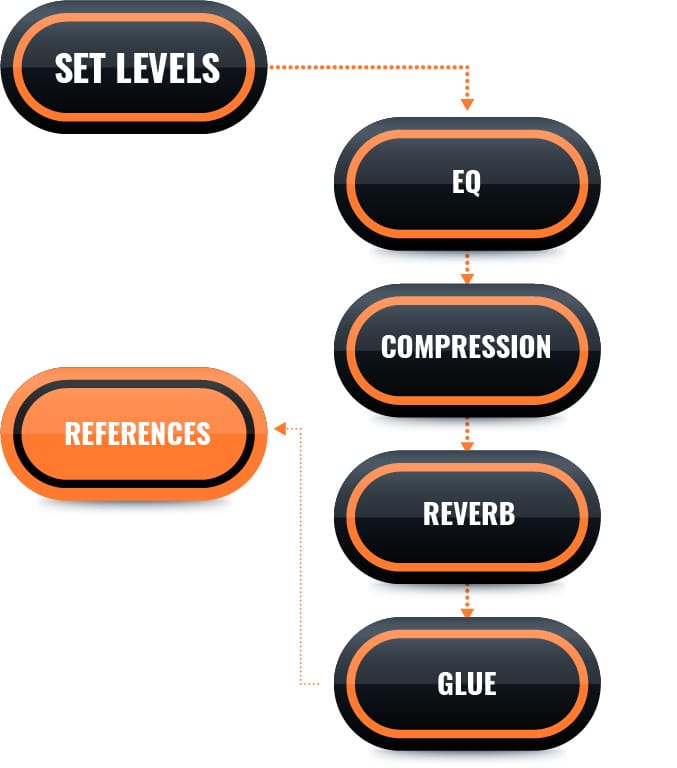
The idea is to use high-value effective moves first and then shift to smaller, detailed items later as you wrap up the mix. These initial moves will not even involve jumping straight into plugins. You begin by setting track levels so the mix feels balanced before any processing. Then, you clean up problem frequencies with EQ, removing mud and masking so each track can have its own space in the frequency spectrum. After that, you use compression to control dynamics and help sounds sit more consistently in the mix. Finally, you add spatial effects to create a sense of depth before gluing everything together on the master bus.
This order works because it mirrors how we perceive sound: volume first, tone second, dynamics third, space last. But when all of these things are working together, you can hear the song's potential almost immediately. This process also prevents beginners from using too many plugins early in the mix, which is one of the most common mistakes. As you gain experience, you’ll discover more advanced workflows and techniques - and you may eventually reorder these steps entirely - but this simple structure will give you reliable results while you’re learning the fundamentals.
Step 1 - Set Levels First
Before touching any EQ, compression, or effects, start by balancing the levels of your tracks. This is the foundation of every good mix. If the track levels and the faders aren’t in the right place, no amount of plugins will fix the underlying imbalance. Setting these levels first forces you to listen to the musical relationships between instruments: which elements should lead, which should support, and how they interact dynamically. It also gives you a sneak peek into the kind of instruments that may be the 'star' of particular sections and which ones are more of the supporting roles.
A good level balance should feel stable, clear, and musical even with no plugins engaged. If something disappears, jumps out too aggressively, or competes with another element, reach for the fader and make an adjustment to the levels before reaching for a plugin. This step trains your ears to recognize natural balance and prevents you from using EQ or compression to attempt to solve problems that are really just level issues.
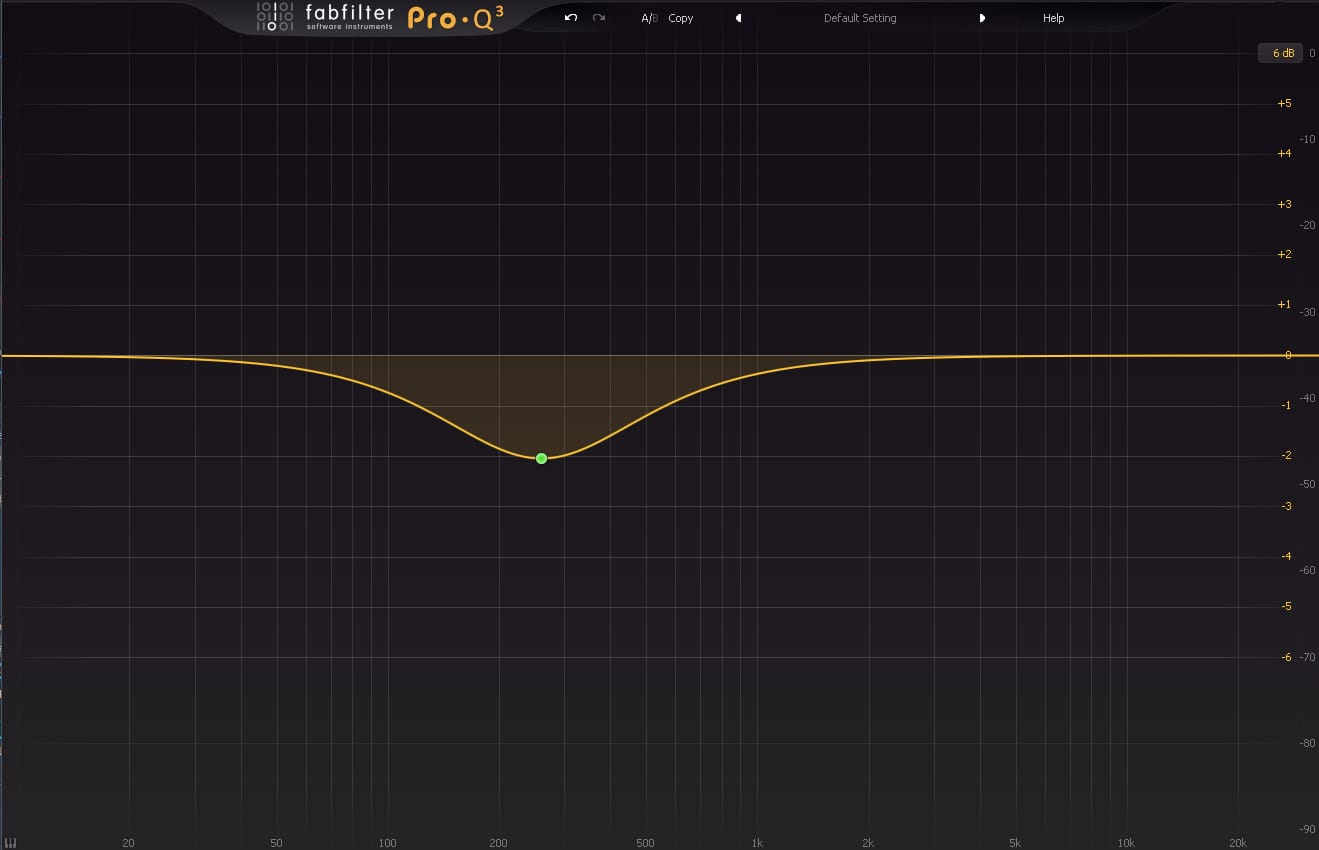
Step 2 - Clean Up with EQ
EQ cleanup is where your mix starts to open up. After setting levels, you’ll notice certain tracks feel muddy, boomy, or harsh. Instead of reaching for boosts, start by removing what doesn’t belong. This is called 'subtractive EQ,' and the point is not to go nuts with cuts but rather take out some of the unpleasant elements that can show up when making a recording or dealing with an instrument part. Typically, subtractive EQ is going to be a good place to start when trying to clean up a mix.
Pull down low‑end rumble on non‑bass instruments, tame boxiness around 300–600 Hz, and reduce harshness in the upper-mids if something feels like it is hitting your ears in a piercing manner. These small cuts create space for the important elements to shine. Because mixes do not have infinite space, it's really important to let each track keep to its own lane instead of crowding others.
Think of this step as clearing the 'audio fog' so you can hear important elements in the mix clearly. You’re not shaping character yet - you’re removing distractions so the mix feels clearer and more intentional.
Step 3 - Control Dynamics with Compression
Once the EQ process is done and you have cleaned up the tonal balance of the mix, compression is the next step. Using a compressor helps to stabilize the performance on a track and helps to get multiple tracks working together at the bus level. At this point in the process, using compressors helps the mix to feel more controlled and musical. These tools smooth out uneven vocals, tighten drums, and add consistency to instruments that jump in and out of the mix.
Start with gentle settings and listen for how the compressor affects the groove. A slower attack lets transients breathe (sometimes called "punch"), while a faster release helps maintain a more consistent energy. The goal isn’t to flatten the sound - it’s to guide it so everything sounds more musical together.
When done right, compression makes the mix feel more confident and cohesive. That feeling when you physically want to bop your head - compression helps bring that out.
Step 4 - Add Depth with Reverb
Depth in the mix becomes important because it can help the listener to hear instruments in different physical places on the 'stage.' This is normally accomplished by using reverb, which helps to provide a feeling of three-dimensionality to your mix.
You have balanced the levels, cleaned up the EQ, and musically controlled the dynamics of your tracks. Now you have a clear canvas to place elements in space. Use reverb to create depth, width, and a sense of environment. If you have ever listened to a song where you could place different instruments in space from front-to-back in a song, that typically happens because of good reverb use.
Short reverbs add presence, medium reverbs add smoothness, and longer reverbs add ambience (atmosphere). Beginners will almost always use too much reverb. They solo the vocal and then pile up the reverb and it sounds awesome to them... but if you do that on every track then you get a big, smeared mess of sound. Reverb needs to be used carefully - too much reverb pushes elements back and makes the mix feel washed out.
Think of reverb as the sense of dimension in a song - just like hearing an orchestra play live, where you can sense where each instruments sits even with your eyes closed.
Step 5 - Gluing the Mix Together
At this point, your mix should feel balanced and mostly sounding like it is living in the same place, but it may still feel more like a collection of separate tracks than a single piece of music that is vibing together. This is where “glue” processing comes in. Glue isn’t about loudness or mastering; it’s about gently pulling the mix together so everything feels like it belongs in the same space and is grooving together.

A simple glue chain includes four tools: a bus compressor, a tape plugin, a limiter or gain plugin, and a meter. The bus compressor will help to 'glue' the tracks and buses together by gently controlling the overall movement of the mix. The tape plugin adds subtle harmonics (warmth) and softens transients (spiky peaks) in a musical way. The limiter or gain plugin brings the mix up to a healthy listening level without clipping. And finally, the meter helps you check your True Peak, LUFS‑S, and LUFS‑I so you know you’re in a safe range for the mix.
This isn’t mastering - it’s just a light finishing touch that helps your mix feel more finished. As you grow, you’ll learn more advanced ways to shape the master bus, but this simple chain is enough to give you a polished, cohesive sound. It is also something that most beginners overlook.
Step 6 - Compare with Reference Tracks
Once your mix feels balanced and cohesive, it’s time to compare it with reference track(s). This step helps you evaluate your work objectively. Level‑match your mix to the reference loudness (LUFS-S for a song section or LUFS-I for the whole song) so you’re comparing fairly, then listen for differences in tone, depth, and energy. Think, "Could my song play next to this reference on a playlist and feel like it belongs?"
In the beginning, this can be a hard comparison, because our minds tend to focus on small items instead of broader items. Think broadly for this exercise. And split up the listening tasks into 'listening passes,' which give you the ability to focus on one aspect of the songs while ignoring the others. You might listen to the sense of space on one pass to feel if your song sounds like it is in the ballpark of the reference. On another pass, you might listen to the overall energy - how does the energy of your verse and chorus sections compare to the reference?
Another beginner mistake is trying to directly copy the reference. This is a fast track way to not finishing your songs. You’re not trying to copy the reference - you’re using it to calibrate your ears and to listen for the kind of differences that might prevent your mix from living in the same territory as your reference. If your mix feels dull compared to the reference, you may need a bit more top‑end. If your low end feels weak, you may need to adjust your bass balance or compression.
References help you catch issues you might miss after listening to your mix for hours. And if you have been listening to mix for hours, go listen to something completely different for a few minutes - help your ears reset. Then, you can come back to your mix with fresh ears so your brain doesn't play tricks on you.
Beginner Mixing Mistakes to Avoid
Beginners often fall into predictable traps: over‑EQing, over‑compressing, adding too much reverb, mixing too loud, and relying on plugins and tips & tricks instead of listening and making more efficient adjustments. Many also spend too much time mixing in solo, trying to perfect individual tracks in isolation. Sounds that may seem "ideal" on their own often fall apart in the full mix, so decisions should always be made when listening to the actual mix. This is called making decisions in 'context.'
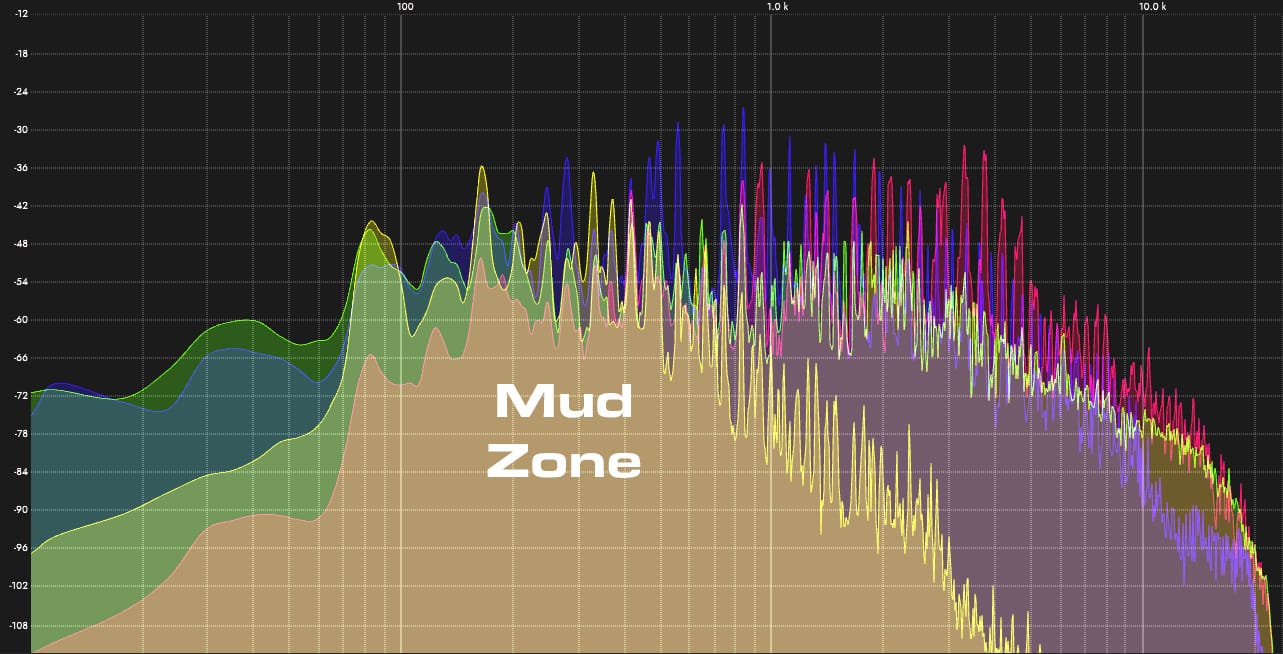
Beginners also run into a handful of specific tonal and spatial problems that make a mix feel unclear or fatiguing. Too much low‑mid energy (the “mud zone” around 200–400 Hz) can make the entire mix feel cloudy and unfocused, especially when guitars, keys, and vocals all pile up in the same range. On the opposite end, harsh high‑frequency boosts can make cymbals, vocals, and synths feel brittle or piercing, which becomes exhausting to listen to over time.
Reverb is another common trap — a little adds depth, but too much washes everything together and pushes important elements to the back of the mix. These issues aren’t signs of a bad song or bad tracks; they’re simply the consequences of not yet knowing what to listen for. Once you recognize these patterns, they become far easier to avoid and much easier to correct.
And, by avoiding these mistakes, it will help you to build better habits and get more consistent results with your music.
Where to Go Next
Now that you understand the fundamentals, the next step is to deepen your skills through focused practice. Explore each of the five core skills in more detail, experiment with different workflows, and start developing your own approach.
As you grow, you’ll learn how to make more intentional decisions, trust your ears, and shape mixes that feel like you. The journey doesn’t end here — this is just the foundation. Everything else builds on top of these principles.
The spark that leads to your next breakthrough.
© Copyright Embervane 2026