
Beatmaking and Modern Production: Building Grooves, Tracks, and Full Songs from Scratch
Let's Make Some Music!
At Embervane, modern production is defined as the art of turning rhythm and emotion into sound. Whether you’re making beats, arranging full songs, or designing sounds from scratch, the goal is always the same: create movement that feels alive. You don’t need a massive studio or expensive gear to make music that feels modern and alive. What you need is a clear process, a good ear, and the willingness to experiment until your ideas start breathing on their own.
This guide gives you a complete foundation for beatmaking and modern production from scratch. You’ll learn how to make beats, program drums that groove, layer sounds for impact, use samples legally and creatively, and build full tracks that sound professional and intentional.
If you are reading along here and not everything is making sense, then it may be worth hopping over to the beginner's roadmap to digital music production to get up to speed - no sweat.
Let's get into it!
How to Make Beats: A Complete Beginner's Guide
Beatmaking starts with rhythm - the heartbeat of modern music. But getting a rhythm is not just drums (and I'm a drummer saying this).
You are looking to build the entire rhythmic foundation that drives the track forward. This means that all rhythmic elements in the song need to gel and work together like a finely-tuned engine.
Whether you’re working in hip‑hop, pop, EDM, or cinematic styles, the process follows the same core steps.
Start With a Groove
Every great beat begins with a pulse - a rhythmic idea that makes your head nod before you even know why. This can be as simple as tapping a pattern on your desk, drawing in a kick‑snare loop, or starting with a hi‑hat rhythm that feels good.
The groove is the emotional anchor of your track. If the groove feels stiff, the entire beat will feel stiff. If the groove feels alive, everything you add afterward will inherit that energy. Spend time here - experiment - have fun - experiment some more.
Try different rhythms as you explore. Don’t rush past this step - it’s the foundation of everything.
Choose Your Sounds Wisely
Sound selection is one of the most underrated skills in beatmaking and music production. A simple pattern can sound massive if the sounds themselves are well chosen. A complex pattern can sound amateur if the sounds clash or feel cheap.
Let's think about the drum kit for a moment as a color palette: each sound should have a distinct tone, texture, and emotional character.
A punchy kick gives clarity. A warm snare gives body. A crisp hi‑hat adds movement.
The goal isn’t to find “perfect” sounds - it’s to find sounds that work together. When your sound selection is strong, your beat feels professional before you even start mixing.
Build in Layers
Once your core groove is solid, begin adding layers that support it. Percussion adds movement. Bass adds weight and harmonic direction. Melodic elements add emotion and identity. Transitions add flow. But here’s the key: every layer must serve the groove.
If a layer distracts from the rhythm, remove it. If a layer adds clutter, simplify it. Be ruthless here in your creative process - something might sound nice on its own but if it does not serve a purpose in this song then out it goes!
Modern production is about clarity, not density. The best beats feel spacious, intentional, and balanced - not crowded.
Structure the Beat
A beat is not a song. A beat is some little part of a song.
But your beat can become a song when it gains structure.
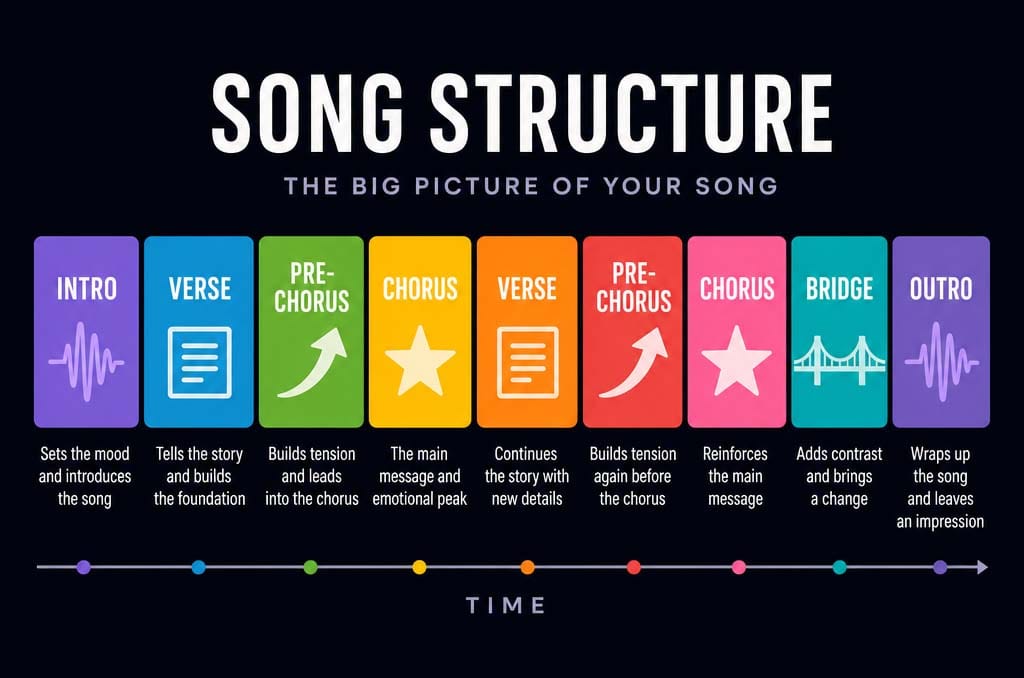
A song is broken up into different sections. And when you are writing better music, you can take a beat (or a starting song section) and transition it into a full song by paying attention to a song structure roadmap.
A beat becomes a song when it gains structure. Think in song sections: intro, verse, chorus, bridge, outro. The chorus is typically the most intense section of the song. (Spoiler alert - start with the chorus and you can subtract elements to create the intro, outro, and even elements of the verse or bridge.)
Another aspect of this structuring is the element of dynamic change.
Even instrumental beats benefit from dynamic changes that keep listeners engaged. Add drops, fills, automation, and subtle variations to create movement.
This can make your beat and eventually song evolve to feel alive. A beat that loops endlessly feels unfinished. Structure is how you turn a cool idea into a track someone wants to listen to again.
How to Program Drums That Don't Sound Robotic
Drum programming is where rhythm becomes personality. It’s the difference between a lifeless loop and a groove that feels human, expressive, and alive.
The secret isn’t expensive plugins and processing - it’s subtle timing, velocity, and texture.
Humanize the Timing
Even the best humans are not perfectly on the beat. That means that music made by humans has variations from the grid in your DAW.
Perfect quantization - putting all the notes right on the grid - is the fastest way to kill a groove. Real drummers never hit perfectly on the grid - their timing breathes.
Shift your snares slightly late for a laid‑back feel. Push your kicks slightly early for urgency. Move hi‑hats off the grid to create swing.
These micro‑timing adjustments are tiny, but they transform your beat from robotic to human. Most DAWs have groove templates - use them as a starting point, then tweak manually until the rhythm feels right.
Vary the Velocity
Velocity is the heartbeat of realism. When every hit lands at the same volume, the rhythm feels mechanical. Lower the velocity of ghost notes, secondary hi‑hats, and off‑beat percussion. Add accents to important hits.
Think like a drummer: some hits are strong, some are soft, some are barely there. Velocity variation creates dynamic contrast and makes your groove breathe.
Use Layering for Texture
Layering isn’t just for loudness - it’s for character. A tight snare layered with a roomy clap adds width. A punchy kick layered with a sub‑kick adds weight. A crisp hi‑hat layered with a noisy shaker adds texture.
Layering lets you design your own drum sounds instead of relying on presets. It’s one of the fastest ways to give your drums a more unique sound on the road to sounding professional.
Add Groove and Swing
If I bring up the word swing, do you think of swing dancing and jazz and then come back with, "Yeah - that's not my genre?"
Well, if you do, then I challenge you to take another look at how swing plays into making songs simply sound better.
Swing is the secret sauce of modern rhythm. It adds personality, attitude, and movement. But swing must be used intentionally - I am not talking about turning your EDM track into a jazz track here.
If you push the swing too much for a genre then the beat starts to break. But ignore swing and you will end up with stiff feel and a sterile beat.
Key Info: Your kick is likely not going to end up having swing on it (although you can still get away with some on a syncopated pattern). Instead, focus a bump in swing to hi‑hats, snare and percussion
The goal here is subtle movement, not chaos. Play with the levels
Modern Drum Techniques
Modern producers use a variety of techniques to add life to their drums. You can play with these and see how they work for you:
Ghost notes for realism (little in-between notes)
Off‑beat percussion for tension (syncopation)
Reverse samples for transitions
Automation for evolving energy
Noise layers for texture
Transient shaping for punch
Drum programming is at the core of rhythm design - the literal heart of the groove in many cases. These techniques allow your drum beat to become more alive.
The Basics of EDM, Trap, and Pop Production Styles
Modern production styles share common DNA but differ in energy, arrangement, and sound design. Understanding these differences helps you adapt your workflow and blend genres creatively.
EDM (Electronic Dance Music)
EDM is built around energy flow - builds, drops, tension, and release typically with a 'four on the floor' kick pattern to keep the dance floor moving. Producers use sidechain compression to make the mix pump with the kick, bright synths for excitement, and wide stereo imaging for impact.
Automation is essential: filters open, reverbs expand, delays stretch, and risers build tension. The arrangement is almost cinematic - every section pushes toward the next. EDM is about momentum, movement, and emotional lift.
Trap
Trap is defined by rhythmic complexity and texture. The 808 bass is the star - gliding, bending, distorting, and anchoring the low end. Hi‑hats roll in triplets, snares snap sharply, and melodies are sparse but haunting.
Trap thrives on contrast: minimal verses explode into heavy drops, and space becomes part of the groove. Producers use pitch automation, half‑time effects, and creative sampling to keep the sound fresh and modern.
Pop
Pop production centers on clarity, emotion, and accessibility. Every sound supports the vocal. The mix is balanced, the arrangement is clean, and transitions are polished.
Pop producers use subtle compression, tasteful reverb, and automation to keep the listener’s attention without overwhelming them. These songs can have a whole bunch of ear candy and cool transitions to keep the vibe going. The goal is emotional connection - a sound that feels familiar but fresh.
How to Layer Drums for Punchier Beats
Layering drums is one of the fastest ways to make your beats sound professional. It’s not about stacking random samples - it’s about combining complementary tones that fill out the frequency spectrum and create impact.
Kick Layering
The kick is the low-frequency foundation to your drumbeat. And a great kick has two key parts: attack and weight. Layering can help you accentuate either or both parts if your current kick isn't cutting it.
If you want to spice up your kick sound, consider pairing a punchy kick with midrange attack and a sub‑kick with low‑end power. The high kick gives clarity; the low kick gives impact. Blend them until they feel like one unified sound.
Then, you can use EQ to carve space - cut lows from the top layer and highs from the bottom layer so they don’t compete with each other.
Snare Layering
The snare is that mid-frequency backbeat hit that helps to drive the rhythm while demanding attention. While a great snare is a mix of both the resonant drum sound and the buzz of the metal spring 'snares' on the bottom of the instrument, its character can still be enhanced with layering.
When you listen to your groove, try to find moments where you can combine a different tight snare for body, a clap for width, or a rimshot for snap. Each layer adds a different dimension.
Layering lets you design your own snare sound instead of relying on presets or samples. It’s one of the fastest ways to make your drums sound unique.
Hi-Hat Layering
Layering isn't just for your core drums - hi‑hats benefit from layering too. While mixing open and closed hat hits create movement inside a drumbeat, using layering especially on certain accent notes can help to give the drumbeat more character overall.
Add if you need to fill up some space in the groove where the hat hits are too spread out, you can use subtle percussion (shakers, tambourines, noise layers) to fill space. Hi‑hats are the high-frequency rhythmic element of your groove; layering gives them personality.
Phase & EQ
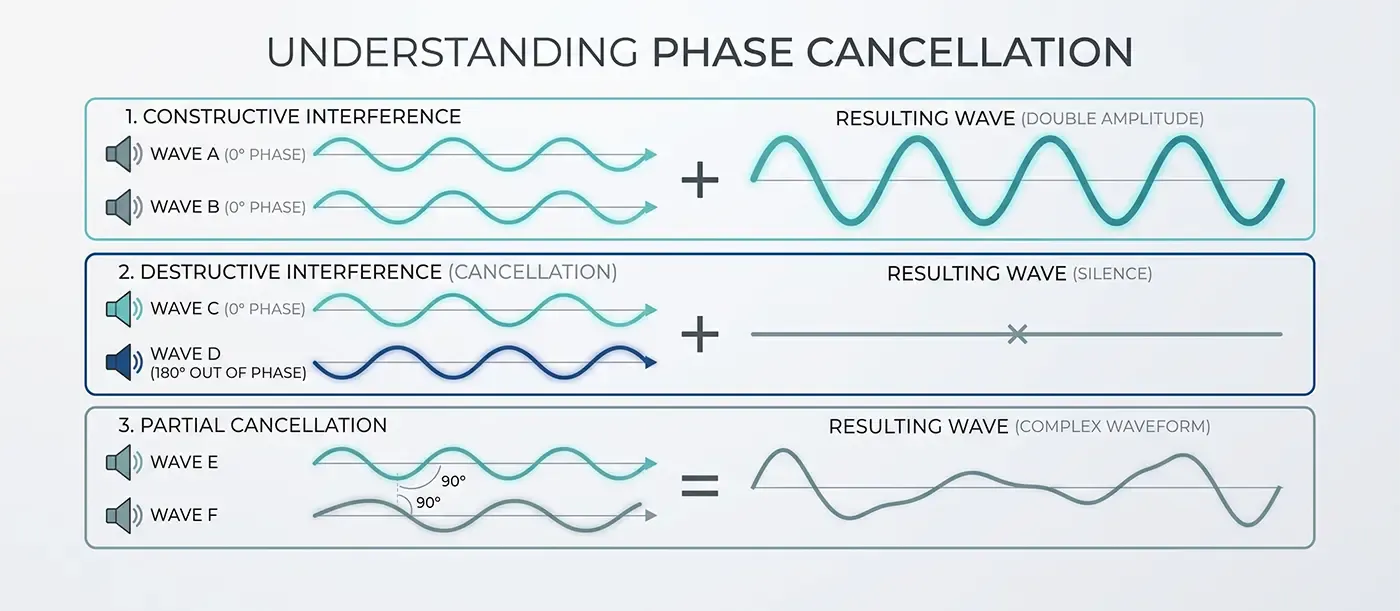
Just like with live recordings using multiple microphone sources, when you layer sounds you can introduce phase issues.
Every waveform of sound has a positive and negative part to its wave. If you layer up one sound that lines its negative with your core sound's positive then you get cancellation that can make things sound strange.
Always check phase alignment when layering. If two samples are out of phase, they’ll cancel each other out and weaken the sound. Flip the phase of the added sound or adjust timing until the layers reinforce each other. Use EQ to carve space so layers complement rather than compete.
Creative Layering
Try blending acoustic and electronic elements - a live snare with a digital clap, or a vinyl kick with a clean sub.
This can work outside of percussion instruments, too. Boost a guitar chug with a pizzicato string or a mid-frequency transient hit. A bass guitar can have more impact when layered with a synth stab.
Hybrid layering creates unique textures that stand out in a crowded mix.
How to Use Samples Legally and Creatively in Your Music
Sampling is a powerful tool in modern production. It connects your music to history while giving you endless creative possibilities. But it also comes with rules - and understanding them keeps you safe and professional.
Legal Basics
First and foremost, I am not an attorney, so be sure and check with yours to make sure any use of someone else's copyrighted material is legitimate and cleared.
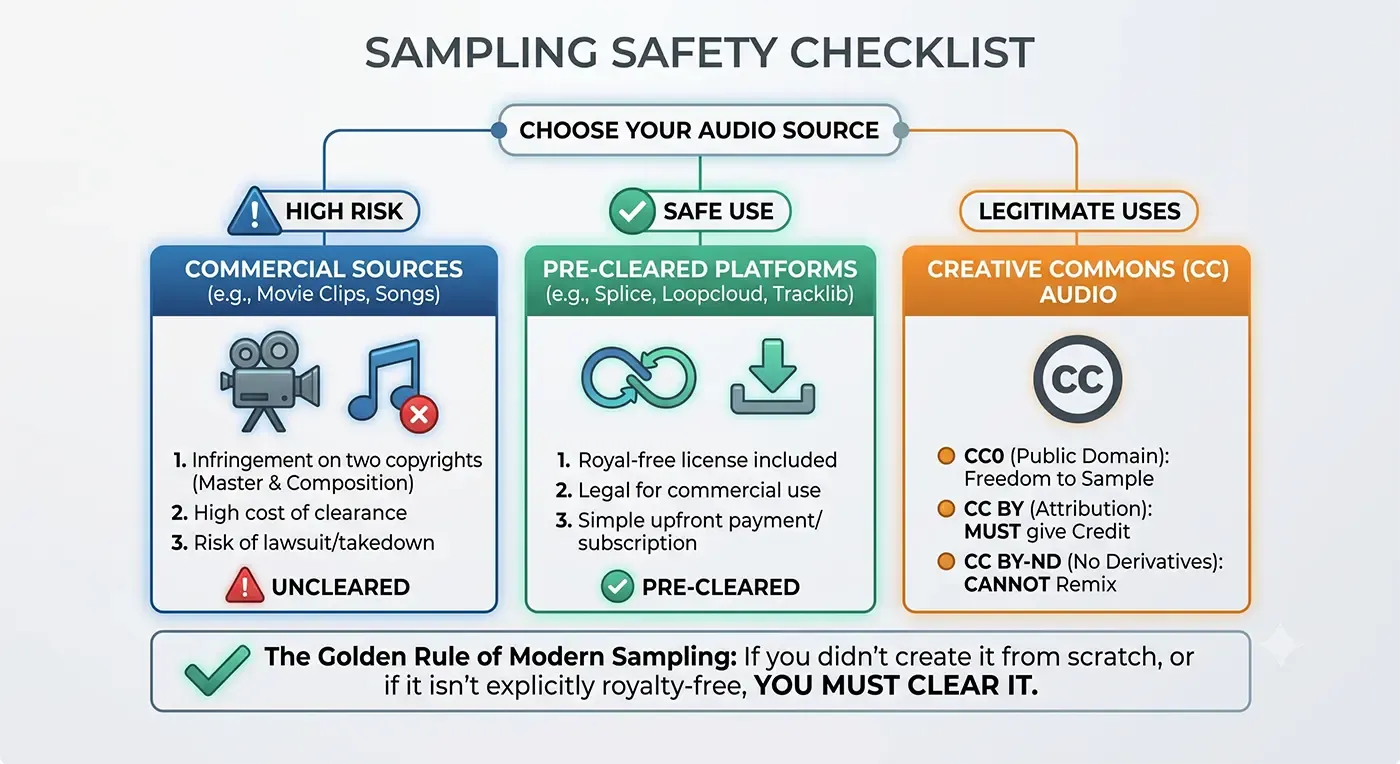
The legal use of samples is a very delicate area, because the use of someone else's material in your own creation can trigger two separate copyright infringement areas: the composition (publishing) and the sound recording (master).
If you are going to use samples from another copyrighted source, be very careful to follow the rules.
Can you Take a Sample from a Movie or a Television Show and just Drop it into Your Song?
It seems so cool, right? You just take that little segment of a spoken line and build a song around it. But this is not legal.
In order to be a legal use, a sample needs to be transformative. And in order to be considered transformative, a sample needs to pass a fair use test.
No - changing the pitch or chopping it up or adding distortion is not considered to be transformative.
Transformative Sample Use and the Fair Use Test
The Fair Use Test states three things:
1 - the use of the copyrighted material needs to alter the meaning or message. This means that you can't use someone else's work just because 'it sounds cool.' True transformation means you are using the sample to comment on, criticize, parody or shed new light on the original material.
2 -the new use cannot serve as a market substitute. This means that if your song uses a sample in a manner that people could listen to your track instead of the original or if your track reduces the value of the original, then that would fail this test.
3 - the new use cannot simply be 'aesthetic enhancement.' And this is where most creatives will get into trouble if they haven't already. Changing the pitch, distorting, reversing, or burying the sample under some other instruments is an aesthetic enhancement, not a transformative one. Changing the sonics is not the same as changing the purpose.
Because the legal defense of 'Fair Use' is super expensive to fight in court, a good rule of thumb is this:
If you didn't create it from scratch, or it isn't explicitly royalty-free, you must clear it to use it.
And that means contacting the owner and very likely paying for use, assuming they agree.
Where to Find Samples
So, if snagging some spoken words from a movie or show isn't going to work, then what is a modern producer to do? Your best bet will be to pay for them, search for them, or make them yourself.
Buy Samples
Anything that you purchase which gives you a royalty-free license to use is fair game. Lean into that.
Sample packs are one option and subscription services for royalty-free content is another. Platforms like Splice, Loopcloud, or Tracklib are pre-cleared platforms where you are purchasing a royalty-free license to use the work commercially without needing to clear the sample yourself.
Creative Commons
If some material you want to sample has a Creative Commons license, that doesn't automatically mean it is free to use the way you want to. However, the keys here are to look for CC0 (Public Domain) and CC BY (Attribution).
Public Domain is the best situation - free use for all! But material normally has to wait a pretty long time before it falls into this category with today's copyright laws.
Attribution means that you can use the audio for anything - even commercial releases. But you must give credit to the original creator in your song's metadata or description.
Create Samples
Can't find what you want? Go take that microphone and record stuff. That's right - go make your own sounds or samples. If you were going to record your own vocals, then this is how you would work anyway.
Just remember, if you are recording the output of copyrighted material with your microphone, that puts you back into the Fair Use test failure trap.
Who knows, you might end up coming up with your own sample banks that you can sell to others.
How to Build a Beat from Scratch: Step-By-Step Workflow
Creating a full beat from scratch is where everything comes together - rhythm, sound selection, arrangement, and even some mixing. In this example, we are going to start with the drums.
Pro Tip: You are never locked into this order. Start with whatever gets the creative juices flowing - a melody, a bassline, whatever - and ride the lightning!
Step 1: Lay Down the Kick & Snare Foundation
Start by programming a foundational kick and snare pattern that locks in a solid groove. Don’t overthink the pattern or waste an hour scrolling through samples right now - focus entirely on creating rhythmic movement, find a pocket you like, and move on.
Step 2: Add Hi-Hats and Percussion Dynamics
Introduce micro-rhythms and energy variation with your high-frequency percussion elements (hi-hats, shakers, rims). Vary your MIDI velocity and slightly offset the timing to give the drums a swinging, human feel rather than a rigid, robotic pulse.
Step 3: Lock in the Bassline
Your bass defines the harmonic foundation and weight of the track. Focus on interlocking the bass notes with your kick drum hits; when the kick and the low-end strike together in perfect synchronization, it creates a tight, punishing low-end that translates to any sound system.
Step 4: Layer in Melody & Harmony Elements
Bring emotion and vibe to the track using chords, ambient pads, or synth leads. Arrange these melodic elements so they dance cleanly around your drum groove rather than fighting it.
Remember the ultimate rule of arrangement: space is part of the groove, so leave room for the music to breathe.
Step 5: Arrange into a Full Song Structure
Transform your repetitive loop into a dynamic song structure with an intro, verse, chorus, and bridges. Create contrast by using subtraction to drop instruments out during intimate verses, and use layering to pile elements on for massive, explosive hooks. Blend the sections together smoothly using creative transitions and volume automation.
Step 6: Balance, Mix and Polish
Shape the final soundscape by balancing your fader levels so the primary elements shine. Use EQ to carve out muddy frequencies so instruments aren't fighting for the same sonic space. Apply subtle bus compression to "glue" the entire mix together into a cohesive, professional package.
Step 7: Export and "The Car" Test
Bounce your final mix down to a high-quality audio file and take it out of the studio. Listen to it on regular consumer devices - earbuds, phone speakers, and the ultimate equalizer: the car stereo. Take detailed notes on what sounds too loud or too quiet and adjust your mix until it hits perfectly everywhere.
Where to Go Next
Beatmaking and modern production are about expression, not perfection. When you understand rhythm, sound selection, layering, sampling, and arrangement, you can build music that feels intentional and alive - no advanced gear required.
And all of this comes with the clarity of a plan combined with the confidence given through repetition. Go make some music and practice your skills here.
Found this guide helpful?
Spread the word and share with another creator.
Previous Main Topic <
Next Main Topic >
About the Author

Jim is the creator of Embervane - a lifelong music maker with a curiosity‑driven approach to creativity and learning. He has been playing drums since age nine and composing seriously since 2018, continually refining his craft through study, experimentation, and hands‑on practice.
With a background in chemistry and more than two decades of studying behavioral psychology, Jim brings a unique blend of scientific thinking and human understanding to music education. He beta‑tests tools for companies like Mastering the Mix, Kit Plugins, and Soundiron, which keeps him close to the evolving landscape of modern production.
Jim isn’t a celebrity producer or award‑winning engineer - he’s a creator who remembers exactly what it feels like to struggle, learn, and grow. His mission is to help other music makers build clarity, confidence, and momentum in their craft.
Jim is the creator of Embervane - a lifelong music maker with a curiosity‑driven approach to creativity and learning. He has been playing drums since age nine and composing seriously since 2018, continually refining his craft through study, experimentation, and hands‑on practice.
With a background in chemistry and more than two decades of studying behavioral psychology, Jim brings a unique blend of scientific thinking and human understanding to music education. He beta‑tests tools for companies like Mastering the Mix, Kit Plugins, and Soundiron, which keeps him close to the evolving landscape of modern production.
Jim isn’t a celebrity producer or award‑winning engineer - he’s a creator who remembers exactly what it feels like to struggle, learn, and grow. His mission is to help other music makers build clarity, confidence, and momentum in their craft.


©2026 Embervane LLC. All rights reserved. Embervane™ is a trademark of Embervane LLC.