
Set Up Your Home Studio Without Wasting Money
Wasting Money Sucks!
We all have felt it before - you buy something and then it does not live up to what you expected. And face it, that sucks. Well, this guide is meant to help reduce that kind of experience as you get your home music studio set up.
Look - you don’t need a perfect room, expensive gear, or a massive budget to build a home musical recording/production space. What you need is clarity - knowing what matters, what doesn’t, and how to make smart decisions that support your workflow. Not drain your wallet.
I am a value guy, which means I am not afraid of spending money. But I want to make sure that I get a big bang for my buck. In order to do that, it is important when following the roadmap to digital music production to have enough knowledge to make a more informed decision around purchases.
But do you know what is more impressive? Making great sounding music. Have a great song and very few people are going to ask, "which piece of hardware did you use in that line?" So, let's stick with the basics for now.
This guide walks you through how to choose the right space, treat it intelligently, position your gear, build a budget‑friendly setup, avoid common money traps, and expand your space over time.
By the end, you’ll know exactly how to create a clean, functional, inspiring home music studio without wasting money.
Choosing the Right Space (Even in a Small Room)
Your studio is your musical home. It doesn’t need to be big. It needs to be intentional. Even a small bedroom, office corner, or shared living space can become a highly functional music studio if you understand how the room affects sound.
I have helped people who have been on a minimal laptop + headphones setup to those that had a huge music production studio setup and just about everything in between. And if there is one thing that I found come up more times than not, it was the balance between the look of the space and the sound quality of the space.
Room Size (Looks vs. Sound)
You have a decision to make: either you want to have a space that is really great looking where you dig the vibe or you want your room to have the best quality of sound it can have.
Now, this is not an either/or kind of choice, but it is very important. Because if looks are more important than sound quality to you then go get setup with some headphones and get to work. Your room setup will not matter at all in that case.
But if you want the best quality of sound when choosing the right space for your home music production studio, then there are some considerations that need to be taken into account which will eclipse the looks of your room into secondary importance.
If you decide that you want quality of sound as the more important aspect of your music space, then pay attention to these key areas:
Noise
If you have two rooms where you can set your music space up, choose the quietest one if all other things are equal. Why? Because you will be fighting with this noise. You may spend money to try and treat the noise even.
But it would be much more cost-effective to just dodge the noise situation. You'll want to avoid the following:
noisy HVAC vents
windows facing busy streets (this is a big one!)
refrigerators or appliances
shared walls with noisy neighbors (bad for you; bad for them)
Noise doesn’t just ruin recordings - it kills momentum. A quiet space helps you focus and record clean audio without frustration. Give yourself the joy of removing external distractions by paying attention to the noise level in your target room.
Reflections
Reflections are sound bouncing off hard surfaces generally from your speakers. (If you are using headphones, this is a non-issue). They create harshness, echo, and comb filtering. Small changes can make a difference when it comes to knocking out reflections.
You can reduce reflections by:
not placing your desk in a corner
using acoustic treatment at reflection points
positioning your desk in a way that some reflections are blocked
Desk Placement
The placement of your desk will only matter if you are using studio monitors. If you are using headphones, move on.
When placing your desk, the goal is to create more depth than width. Normally, that means facing the 'short' wall in your room. If your room is a perfect square then pick your wall because the result will normally be the same.
Center yourself on this wall between the left and right wall surfaces. That gives you equal distance between each ear and the wall to the left and right.
Align your desk so when you sit at it you are facing the wall. You'll want to move your desk back roughly to a point where your head is about 1/3 of the way into the room.
That will get you close to a good spot for minimizing sound issues. However, proper measurements and testing is normally required to dial that in.
Next Steps
With your desk in the right placement, you can set your monitors up into an equilateral triangle as a solid starting point for your listening environment.
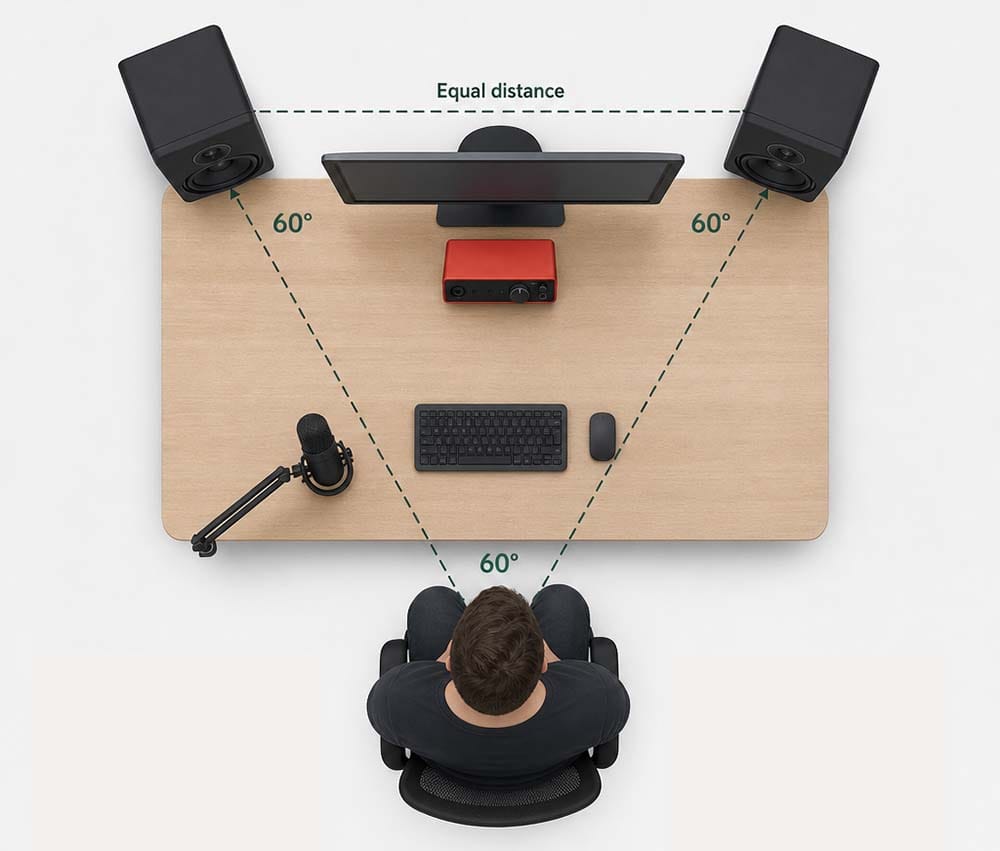
From this point, you have found your 'sonic home.' This will be important if you decide to use acoustic treatment in your room, which is generally recommended in the long run.
Acoustic Treatment
When it comes to your room sounding a good as possible, acoustic treatment is one of the most effective upgrades you can make. Having a properly treated room can massively improve the clarity of sound that you hear in your listening position.
However, it is not necessarily inexpensive to treat a room. On top of that, it is a serious rabbit-hole for time and money, so keep that in mind here.
The value of acoustic treatment will show itself when you are getting toward the end of your song-making process, one that is fully mapped out in the Embervane Sparkflow Map free resource.
By the way, if you are working off of headphones, skip this whole section - you don't need to worry about acoustic treatment unless you are using studio monitors.
If you are using monitors, then there are some questions you need to answer before you pursue treatment:
1) Are you the type of person that would make something yourself or purchase something pre-made?
While the DIY route will help save some money, it will require effort and some mild construction skills. The pre-made option will cost more, but the time spend will be primarily spent on installation of the treatment.
2) Are you going to be okay spending time away from making music while you get your room 'tuned up?'
If you are getting your room in a great acoustic place, it will take time - period. Measurements are needed to not waste money on treatment that is not matched for your needs, and that is not a one-button fix situation.
(Makes that headphone route sound pretty good right now, doesn't it? Yeah - it really is the better route for new music producers.)
Why It Matters
Your room affects your sound more than your gear does. If your room is untreated, you will experience any or all of these issues:
boomy bass / rumbly low-end
harsh reflections / challenging high-end
inaccurate mixes
unpredictable frequency responses
Let's take a brief look at concerns around treatment options:
Bass "Traps"
I really don't like the term bass "traps." That is a marketing term to make an absorber sound like it will magically fix your low-end if you buy it.
The fact is that a bass "trap" is normally just a thicker absorber, and absorbers will absorb all frequencies.
Because they are thicker, they will typically cost more if you are purchasing them.
Absorbers
Absorbers use a porous material to suck up the energy of the sound in the air, in a manner of speaking. Using these absorbers correctly can help to reduce that boomy bass which tends to build up in corners of the room. Absorbers also are great at eliminating first reflections.
Diffusion vs. Absorption
Absorption reduces reflections and controls echo by absorbing the energy of sound that hits it.
Diffusion scatters sound around and changes it from a solid wave into a 'smeared' wave.
If you are purchasing absorbers from a company that make them, diffusion panels are often an upsell point. Normally, these are not so necessary, but they look cool - buyer beware.
All of acoustic treatment relies on physics considerations for it to work properly. Diffusion magnifies that effect - only certain frequencies are affected and then only if the diffuser is at least a specific distance from the listener.
When you start, just focus on absorption. The goal at the start is not to get your room perfect, but to get it into a workable scenario.
By the way - did I mention that if you are you just using headphones, you get to ignore all of this?
Cheap DIY Options
You might think that hanging some curtains or putting a mattress on the back wall or even setting up a bookshelf behind you is the way to handle acoustic treatment. Spoiler alert - it is not!
A bookshelf is not a diffuser - ignore diffusers right now and focus on absorption.
Your shiny reflective guitars or drums? Yeah - those reflect sound pretty harshly, so you might need to rearrange some stuff if you have those.
But if you want to look at some less expensive do-it-yourself kind of treatment, you can make a dent in your acoustic treatment with some of these methods:
Check out DIY absorber videos on YouTube
DIY absorber panels do not require a massive effort nor skill
Focus on high value areas like your front wall and room corners
Treat in stages - don't try to get everything in one shot
One more note on acoustic treatment - this stuff can be really frustrating at times. Know that this is a process and not a quick fix. If you want the quick fix method and want to pay someone to do it, you will be paying a lot of money. Keep that in mind.
Each improvement you make in the room will move you closer and closer to a pro-level music studio listening experience, so keep the faith here.
(How about those headphones, you know? No acoustic treatment needed!)
How to Build a Home Music Setup Budget Tiers ($0 - $3,000)
Here’s a realistic, beginner‑friendly tier system that avoids the common trap of under‑budgeting early tiers.
Tier 0 - $0 Setup
Free DAW
Laptop or desktop (one you already own)
Earbuds or basic headphones (some you already own)
Free plugins
No external gear
Purpose: Learn the basics before spending money
Tier 1 - $250 Setup
USB Microphone
Closed-back headphones
Fre DAW
Basic MIDI Controller (optional)
Purpose: Record vocals and start producing with minimal investment
Tier 2 - $500 Setup
Entry‑level audio interface
Entry‑level XLR microphone
Closed‑back headphones
Small MIDI controller
Purpose: Build a real new producer music studio with proper recording capabilities
Tier 3 - $1,000 Setup
Better interface
Better microphone
Entry‑level studio monitors
Basic acoustic treatment (i.e., two front panels - DIY)
MIDI controller with pads
Purpose: Create a versatile, well-rounded producer home music setup. Remember that with speakers, you will need to choose your desk position carefully.
Tier 4 - $2,000 Setup
Mid‑range monitors or Better headphones
Mid‑range microphone
Additional acoustic treatment (i.e., reflection and corner treatment)
49-key or more MIDI controller
Purpose: Build a semi-pro music space with more accurate monitoring
Tier 5 - $3,000+ Setup
Professional monitors or High-end headphones
High‑quality interface
Premium microphone
More complete acoustic treatment
Specialized controllers
Purpose: Create a home music setup that approaches professional-quality sound
What to Prioritize (Regardless of Budget)
quality studio monitors or quality headphones
clean recording capability (if you will record)
workflow simplicity
acoustic treatment (if using studio monitors)
What to Skip
hardware compressors or other gear (learn your tools first)
expensive plugins (start with your DAW plugins first)
multiple microphones (you can get more later if needed)
subwoofers (you can use headphones to test low end)
large keyboards you don’t use (looks cool, but will you use it?)
Common Home Music Studio Money Traps
Avoiding these traps can save producers hundreds of dollars and months of frustrations:
Overbuying
When we start setting up our music space, it is soooo easy to buy too much stuff.
There is no need to buy everything at once. Let your workflow guide you... if you keep hitting a wall then consider your options to remove that barrier before pulling out the credit card.
Wrong Purchase Order
Most producers don’t waste money because they buy bad gear - they waste money because they buy the right gear in the wrong order. When you upgrade out of sequence, you end up fixing problems you don’t actually have, or buying tools your room and workflow can’t support yet.
A great home music studio grows from the inside out: first you learn your DAW, then you improve how you hear, then you improve how you record, and only after that do you expand into monitors, treatment, and specialty tools. When you follow the correct order, every purchase solves a real problem and makes your space feel more capable. When you don’t, you end up with expensive gear that doesn’t move your music forward.
I broke down real-world product examples and recommendations in our essential gear for home music production guide.
Here is the correct order of purchasing:
DAW (can't do much without it, right?)
Headphones (need to hear the music, man)
Audio Interface (this is your new 'sound card' for your computer)
Microphone (only if you are going to record things yourself)
Acoustic Treatment (basically a requirement when you buy speakers)
Upgrades (plugins, hardware, other gear... later stuff)
Most new producers go out and buy studio monitors first - and they regret it.
Many times did I run into people who ran out to purchase some set of speakers without understanding their room or needs, only to end up purchasing something else later. Avoid the regret and frustration - lean into your headphones when you start out.
Ignoring Room Acoustics
A room with acoustic treatment can sound better with less expensive then more expensive gear in an untreated room.
If you are going to choose the studio monitor route, accept the truth that you will have to treat your room with acoustic treatment.
How to Expand Your Music Studio Over Time
It can feel pretty lame to wait to expand your music studio when there is all that great looking gear out there to grab. But wasting money sucks, right?
To keep yourself on a healthy spending pattern with your room, use your skill level to pace your expansion.
If you purchase a whole pile of stuff that you can't use, it just collects dust - that's not cool.
Upgrade Order
When you are hitting a wall repeatedly in your creative workflow, that is generally a signal that an upgrade may be in order. Here are some example paths:
Headphones > Studio Monitors (which will require acoustic treatment)
USB Mic > XLR Mic > 'Color' Mics
Entry Interface > Mid-range Interface
Basic MIDI Controller > Expressive Controller
Basic Acoustic Treatment > Full Room Treatment
When to Replace Gear
Eventually, as your skills grow, gear and plugins will need to be replaced. But if you use these checkpoint questions as potential replacement triggers, you should save some money along the way:
does something limit your workflow?
does something creates friction?
does something no longer fit your genre?
have you outgrown a tool's capabilities?
When to Add Gear (Wisely)
You are going to be bombarded with offers to purchase plugins, instruments, gear, et cetera, as you build out your music studio. Here is where some patience is in order so you make sure that you are making wise purchases early on.
Don't get me wrong - I am big fan of plugin vendors and the work they do. I own a ton of plugins. But that does not mean I started there.
Look to add to gear or plugins when:
you consistently finish projects (new gear doesn't finish projects)
you understand your workflow
you know exactly what problem the new gear solves
you have someone that can give you a solid rundown on the gear
Where to Go Next
This guide focused on the roadmap to not waste money while you are building out your room. By now, you should have a solid view of how to choose your space, treat it intelligently, position your gear, build a budget-friendly setup, and avoid money traps while expanding your music space across time.
If you can keep your setup simple to start, you can let your skills build. Those same skills will tell you when it is time to expand. Expand to early and risk wasting money, for sure.
A great home music studio is not built from expensive gear - it's built from clarity, intention, and consistent practice.
You're building something real here. And you're doing it the right way.
The next step to dive deeper is learning through the following guides. Each one expands on a key aspect of setting up your room without wasting money:
Learn how to choose the best room for your music setup. Simple guide to room size, noise control, and desk placement - even in a small bedroom.
Learn how to treat a room for recording and mixing on a budget. Discover where to place acoustic panels, bass trap basics, and DIY options that work.
Avoid common home production studio gear mistakes. Learn which music equipment to skip, why thin acoustic foam fails, and what budget gear to buy instead.
Grow your music space with smart upgrades and a clear long‑term gear strategy.
Build a home music studio at any budget level with clear gear recommendations and upgrade paths.
Part of doing things the right way is understanding where the puzzle pieces fit. By understanding the whole music-making process from idea to finished song, you can gain a much better sense of when how your music space can grow over time. Download the Embervane Sparkflow Map, a free deep dive resource to grab this knowledge for yourself.
Then, when you need to stop thinking about gear and start making some music, you can dive into the free MIDI Madness Tier 1 course.
Oh, yeah - it's music time!
Found this guide helpful?
Spread the word and share with another creator.
Return to The Roadmap to Digital Music Production Topic Hub
Previous Topic <
> Next Topic
About the Author

Jim is the creator of Embervane - a lifelong music maker with a curiosity‑driven approach to creativity and learning. He has been playing drums since age nine and composing seriously since 2018, continually refining his craft through study, experimentation, and hands‑on practice.
With a background in chemistry and more than two decades of studying behavioral psychology, Jim brings a unique blend of scientific thinking and human understanding to music education. He beta‑tests tools for companies like Mastering the Mix, Kit Plugins, and Soundiron, which keeps him close to the evolving landscape of modern production.
Jim isn’t a celebrity producer or award‑winning engineer - he’s a creator who remembers exactly what it feels like to struggle, learn, and grow. His mission is to help other music makers build clarity, confidence, and momentum in their craft.
Jim is the creator of Embervane - a lifelong music maker with a curiosity‑driven approach to creativity and learning. He has been playing drums since age nine and composing seriously since 2018, continually refining his craft through study, experimentation, and hands‑on practice.
With a background in chemistry and more than two decades of studying behavioral psychology, Jim brings a unique blend of scientific thinking and human understanding to music education. He beta‑tests tools for companies like Mastering the Mix, Kit Plugins, and Soundiron, which keeps him close to the evolving landscape of modern production.
Jim isn’t a celebrity producer or award‑winning engineer - he’s a creator who remembers exactly what it feels like to struggle, learn, and grow. His mission is to help other music makers build clarity, confidence, and momentum in their craft.


©2026 Embervane LLC. All rights reserved. Embervane™ is a trademark of Embervane LLC.