
Equalizing Audio: A Practical Guide to Frequency & Tone Control
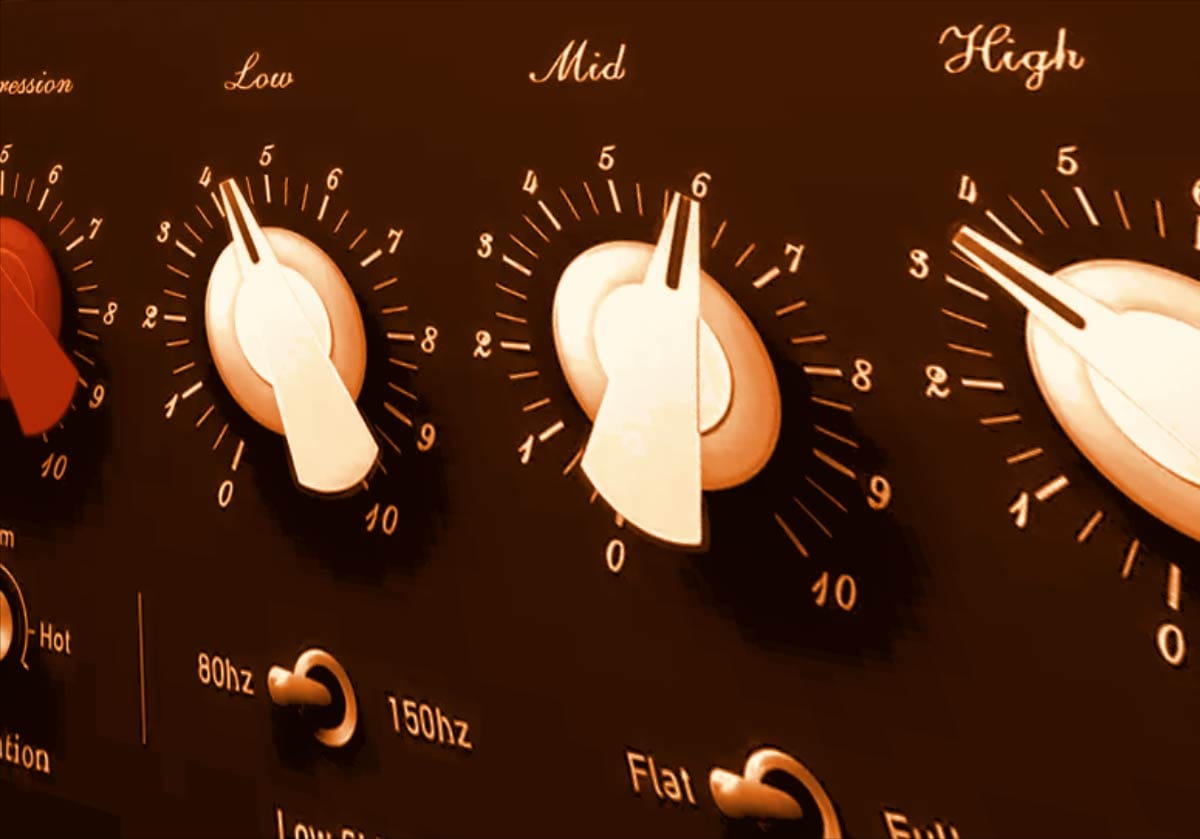
Plugin interface shown: Michelangelo by Tone Projects
Cuts, Boost, and Color!
Watch a beginner pull up an equalizer plugin inside a Digital Audio Workstation (DAW), and their first instinct is almost always the same. They see a giant visual graph, grab a high-shelf node, crank the treble by +8 dB to make the track sound "brighter," and then boost the sub-bass to make it hit harder. Two minutes later, their mix sounds like a razor-sharp, muddy mess that fatigues the ear within seconds.
That is because EQ is one of the most misused fundamental tools in the realm of plugins and processing. Most beginner guides treat equalization like a magic paint palette - telling you where to boost to add "magic sparkle" or "punch" - before you even understand how frequencies clash, mask, and fight for acoustic real estate inside a stereo field.
Let's toss those generic cheat-sheet presets out the window. Learning how to carve away problem frequencies, unmask clashing instruments, and sculpt tonal balance with intentionality is what separates amateur bedroom demos from clean, professional records. Once your ears learn how to identify frequency pockets, dialing in any equalizer becomes second nature.
It is time to learn!
What is Equalization (EQ) in Music Production?
At its core, equalization is nothing more than a highly selective, frequency-specific volume control. While a standard volume fader turns the entire audio signal up or down across the board, an equalizer lets you reach into a sound and adjust the volume of very specific frequency bands independently.
Every sound you record - whether it is a deep kick drum, a soaring lead vocal, or an electric guitar - is made up of a complex recipe of frequencies spanning the full human hearing range: roughly 20 Hz to 20,000 Hz (20 kHz).
An EQ allows you to rebalance that recipe. If a bass guitar has too much boomy low end hiding the kick drum, you turn down just the low-frequency energy. If a vocal sounds dark and muffled, you gently lift the high frequencies.
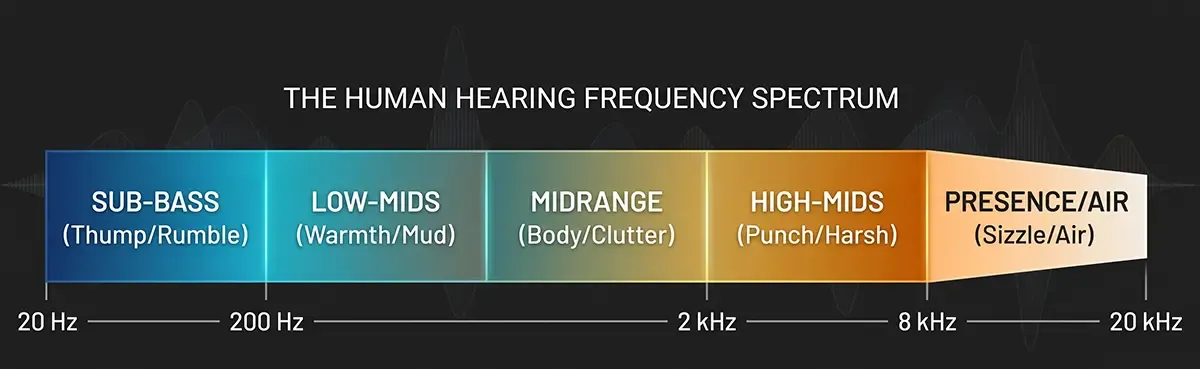
Defining Audio Equalization & The Frequency Spectrum (20 Hz - 20 kHz)
To navigate an equalizer effectively, you must understand how the frequency spectrum is divided into functional acoustic zones:
Sub-Bass (20 Hz - 60 Hz): Felt more than heard. Contains extreme low-end power from sub-synths and kick drum tails. Excessive energy here eats up headroom and turns mixes into mud.
Bass & Low-End (60 Hz - 250 Hz): The fundamental notes of bass guitars, kick drums, and the chest resonance of vocals. This zone provides weight and warmth.
Low-Midrange (250 Hz - 500 Hz): The danger zone for "mud" and "boxiness." Almost every instrument produces fundamental or harmonic energy here, making it the most cluttered region in audio mixing.
Midrange (500 Hz - 2 kHz): The human ear is hyper-sensitive to this region. It carries the body, tone, and character of vocals, snares, and lead instruments.
High-Midrange (2 kHz - 6 kHz): Controls clarity, articulation, and bite. Too little makes an instrument feel distant; too much leads to harshness and ear fatigue.
Presence & High-End (6 kHz - 20 kHz): The realm of treble, cymbal sizzle, vocal sibilance and high-frequency "air".
A Brief History of EQ: From Telephone Line Compensation to DAW Plugins
Long before music producers used EQs to make guitars sound aggressive, equalizers were invented for a completely unglamorous purpose: fixing long-distance telephone lines in the 1920s.
Electrical signals traveling across miles of copper wire lost high frequencies due to resistance. Engineers built filtering circuits to "equalize" (make equal) the frequency response at the receiving end, restoring speech intelligibility.
By the 1950s, recording pioneers like John Volkman and Peter Baxandall brought these filtering networks into recording studios. Producers realized that these same corrective tools could be used creatively to sculpt instrument tones, leading to discrete console channel strips (like Neve and SSL) and modern digital visual parametric EQs.
The EQ Mindset: Tonal Balance vs. Fixing Poor Recordings
A common trap for self-produced artists is using EQ as a band-aid for bad source material. If a vocal was recorded in an untreated closet with a cheap, harsh microphone, no amount of surgical EQing will turn it into a Grammy-winning vocal track.
Approach equalization with two distinct mindsets:
Corrective EQ: Cleaning up technical flaws - cutting mic rumble, taming room resonances, and shaving off harsh sibilance.
Creative EQ: Shaping tonal balance and creating contrast - making a vocal sit gracefully on top of a wall of guitars or sculpting space so every instrument has its own dedicated pocket.
The Anatomy of an Equalizer: Core Parameters & Controls
While different plugin GUIs range from modern digital graphs to vintage knobs on an analog faceplate, almost every equalizer relies on the exact same core parameters.
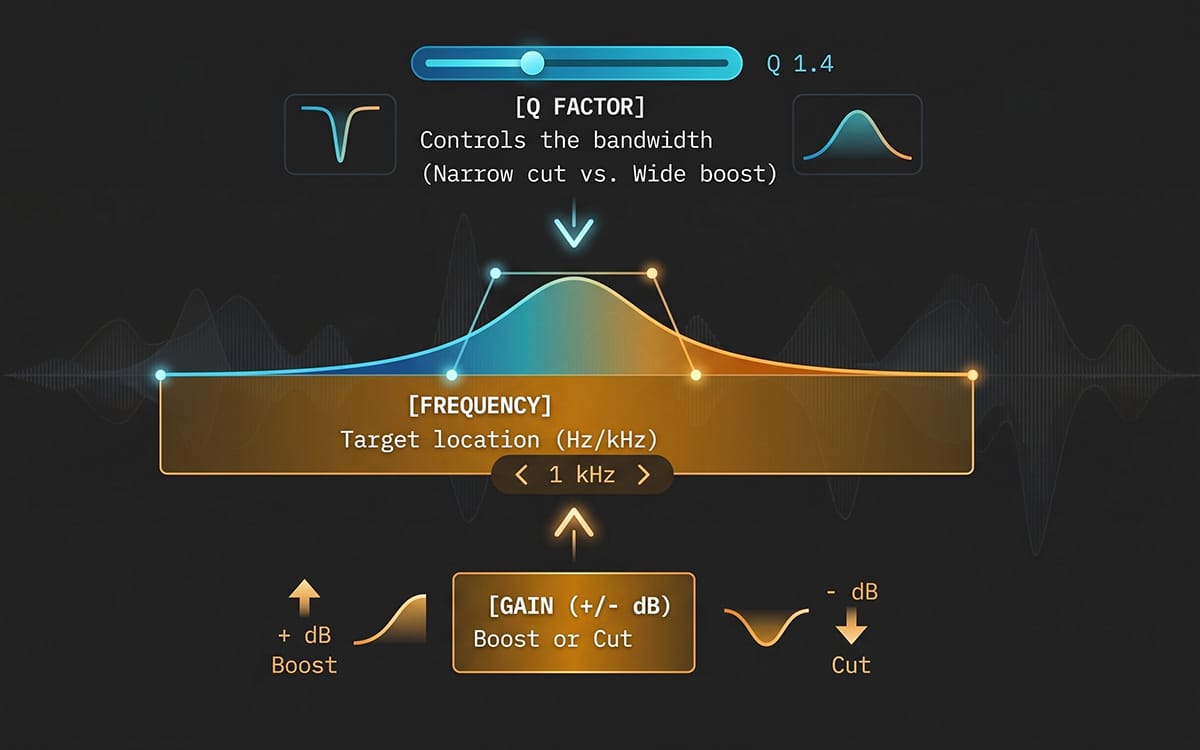
Frequency (Hz & kHz): Target the Problem Area
The frequency control determines where on the audio spectrum the equalizer will act. Measured in Hertz (Hz) for low frequencies and kiloHertz (kHz) for high frequencies, this parameter sets the center or cutoff point for your adjustment.
Gain (dB): Boosting vs. Cutting (Subtractive EQ)
Gain dictates how much you are boosting (turning up) or cutting (turning down) the selected frequency band, measured in decibels (dB).
The Rule of Subtractive EQ
Professional engineers almost always prioritize cutting bad frequencies over boosting good ones. Why?
When you boost a frequency band, you add electrical energy and phase shift to the track, reducing digital headroom and increasing the risk of clutter. When you cut an unwanted frequency (subtractive EQ), you accomplish two things simultaneously: you remove the bad sound and you automatically make the surrounding good frequencies clearer without pushing your volume meters toward clipping.
And EQs are a lot better at cutting frequencies than they are at boosting frequencies. Imagine a very quiet frequency that you are trying to make louder - sometimes you just can't boost it enough, right? But take a louder frequency and you can always turn the volume down on it.
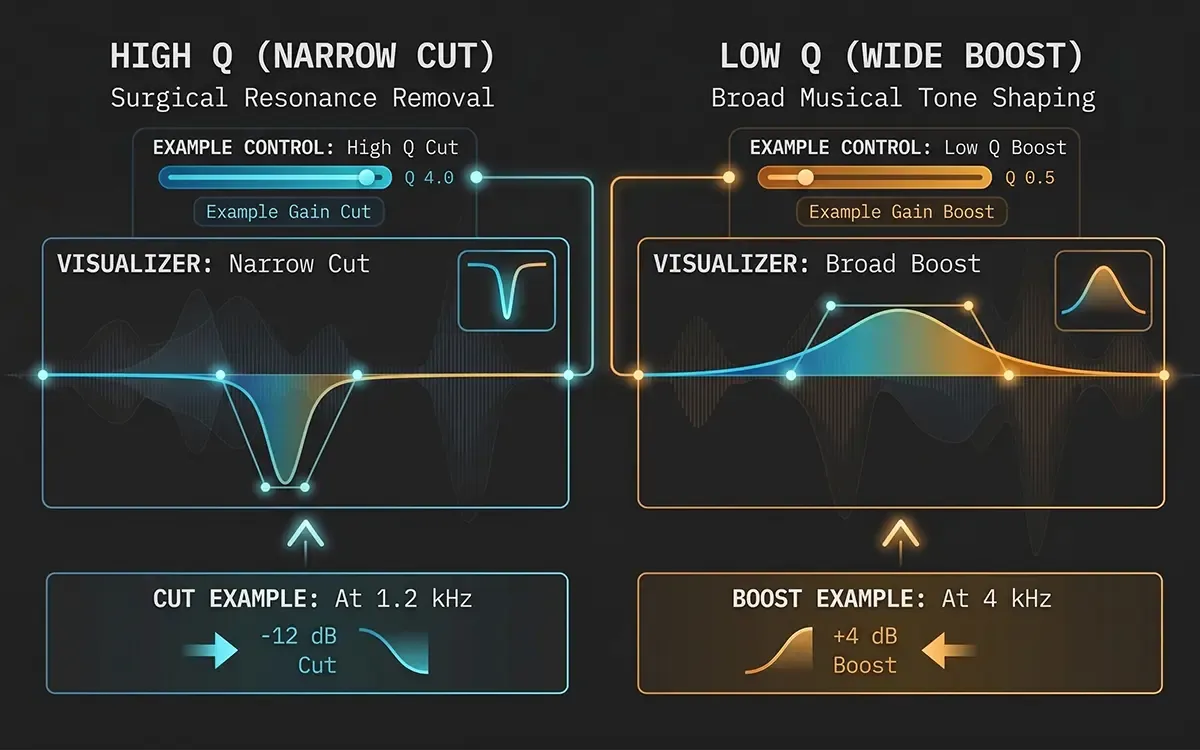
Q Factor (Bandwidth): Surgical Narrow Cuts vs. Musical Wide Boosts
The Q factor (Quality Factor) defines the bandwidth of the EQ curve - how wide or narrow the surrounding area affected by the change will be.
High Q Value (Narrow Bandwidth): Affects a very tight, surgical slice of frequencies. Used primarily for surgical cuts - pinpointing and destroying a single ringing frequency or harsh resonance without destroying the instrument's natural body.
Low Q Value (Wide Bandwidth): Gently affects a broad range of surrounding frequencies. Used for musical tone shaping - gently lifting the high end or adding broad warmth to a mid-range instrument.
Filter Types & Curve Shapes
When working with EQs, there are a variety of different shapes that you can use to adjust the volumes of the frequencies. All of these are called EQ filters. Some filters can completely remove sound below or above a certain threshold frequency, whereas others will adjust the volume depending on the curve shape.
These are the different types of filters you will deal with when working with EQs:
High-Pass (HPF): Cuts the low end and lets higher frequencies pass. Used for cleaning sub-bass on non-bass tracks.
Low-Pass (LPF): Cuts high end and lets lower frequencies pass. Used to remove harshness or a "fizzy" top end.
Bell (Peaking): Looks like a standard "mountain" or "valley" dip. Used for targeted EQ moves or sweeping frequencies.
High-Shelf: Looks like a flat step-up or step-down across the high spectrum. Used for adding or removing overall brightness or "air."
Low-Shelf: Looks like a flat step-up or step-down across the low spectrum. Used for adding or removing overall low-end weight.
Notch: Looks like an ultra-deep, narrow spike down. Used for removing a single frequency.
High-Pass (Low-Cut) & Low-Pass (High-Cut) Filters
A High-Pass Filter (HPF) rolls off low frequencies below a selected cutoff point while letting high frequencies pass through untouched. A Low-Pass Filter (LPF) does the exact opposite - cutting high frequencies while letting low frequencies pass.
HPFs feature adjustable slopes (measured in dB per octave, e.g., 6 dB/oct, 12 dB/oct, 24 dB/oct, etc.). Steeper slopes cut low end aggressively, while gentler slopes provide a natural roll-off.
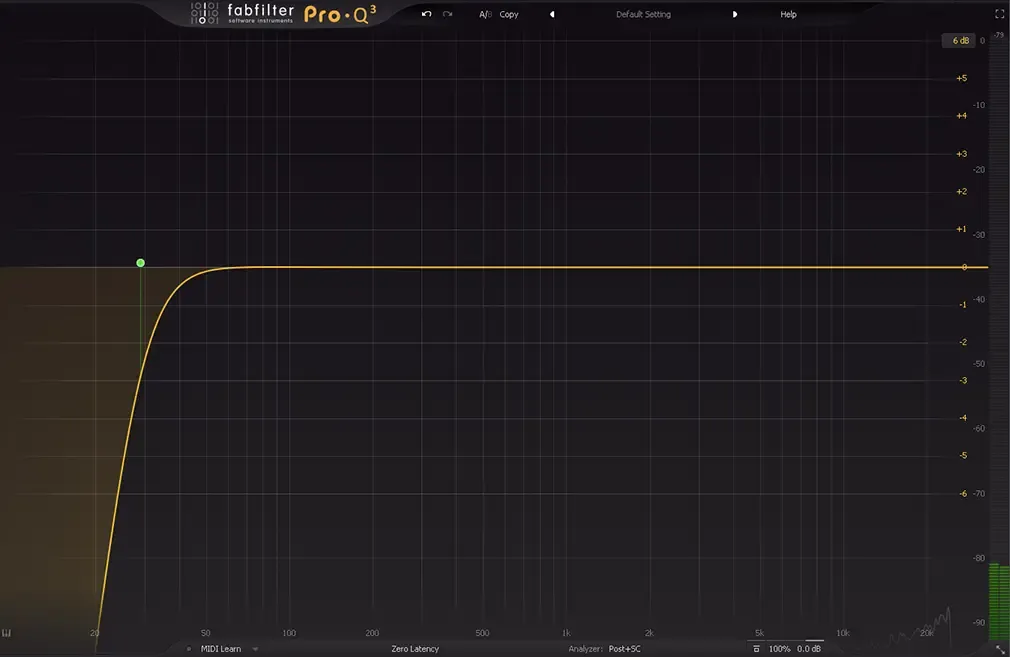
Plugin Interface: A High-Pass Filter in Pro-Q3 by FabFilter
Bell (Peaking) Curves
The bell curve is the most common filter shape in equalization. It raises or lowers frequencies around a central point, tapering off smoothly on both sides according to the Q factor setting. The larger the Q number, the narrower the bell curve. The lower the Q number, the wider the bell curve.
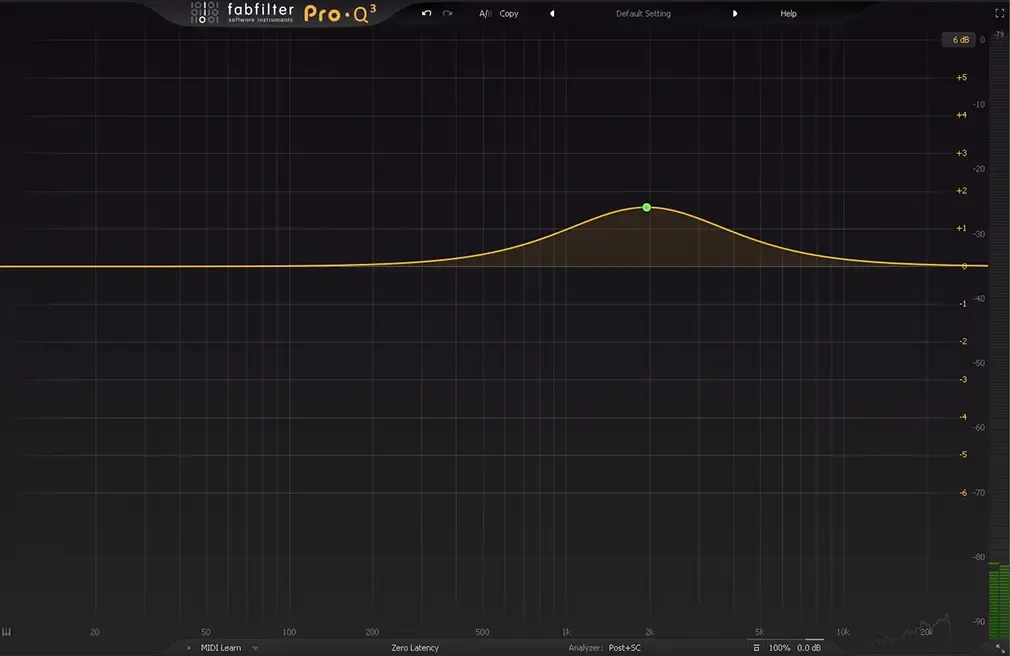
Plugin Interface: A Bell Filter in Pro-Q3 by FabFilter
High-Shelf & Low-Shelf Filters
A shelf filter affects all frequencies above or below a chosen cutoff point equally. Instead of dipping back down like a bell curve, a High-Shelf steps the volume level up or down and maintains that level all the way to the top of the frequency spectrum (20 kHz).
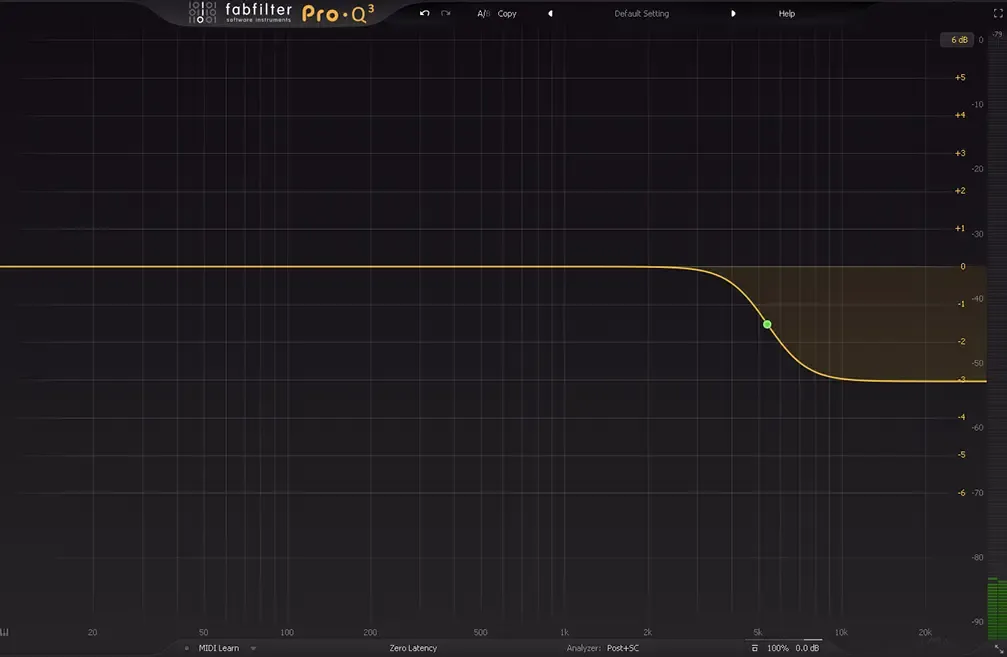
Plugin Interface: A High-Shelf Filter in Pro-Q3 by FabFilter
Notch Filters & Band-Pass Filters
A notch filter is an extreme bell curve with an ultra-high Q factor designed to drop a razor-thin frequency slice down by -20 dB or more - perfect for killing 60 Hz electrical hum or ground loop noise without altering the rest of the sound.
A band-pass filter is like a high-pass and low-pass filter combined - it lets sound through only between two frequency ranges.
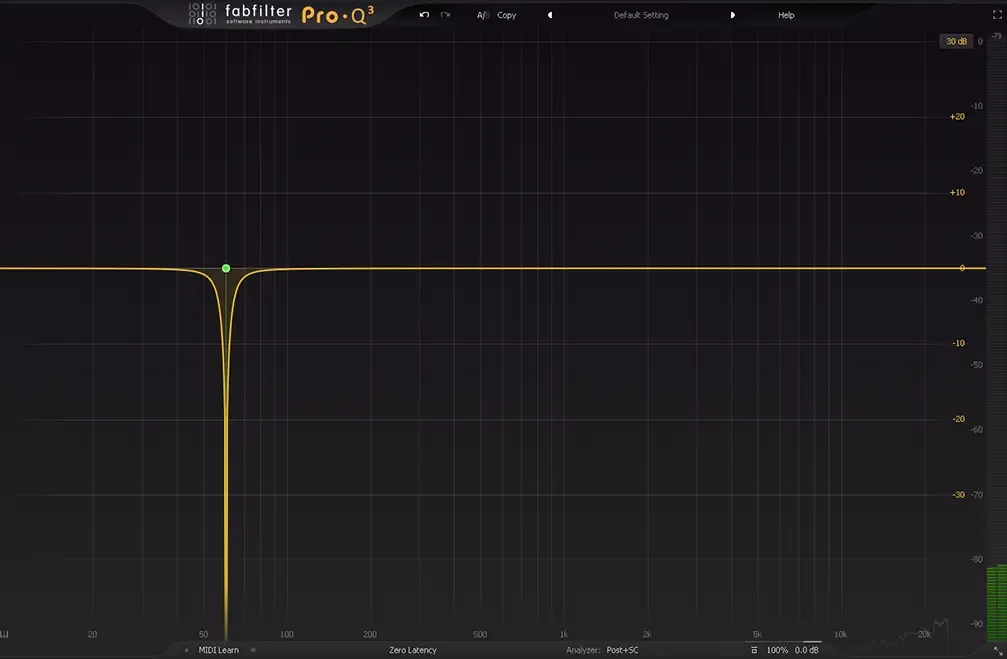
Plugin Interface: A Notch Filter in Pro-Q3 by FabFilter
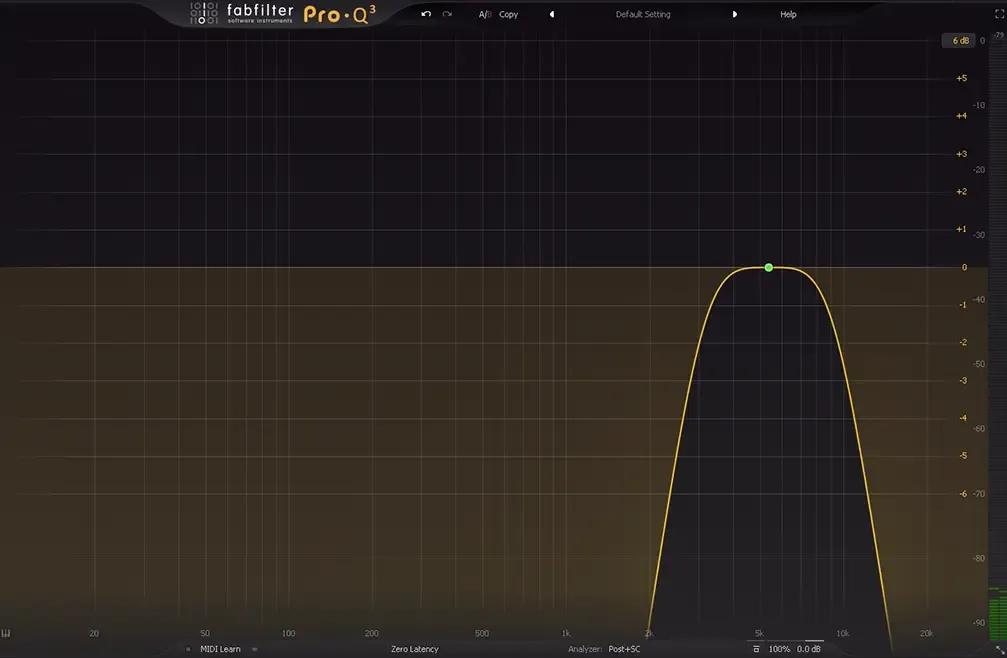
Plugin Interface: A Band Pass Filter Pro-Q3 by FabFilter
Listen to how different EQ filters alter the sound in these examples:
Raw Audio:
Listen to the original, unprocessed audio.
Electric Guitar with High Pass filter applied at 1 kHz:
Listen to how all of the low-end frequencies are gone because of this filter. The guitar has lost its brightness and sounds muddy.
Electric Guitar with Low Pass filter applied at 1 kHz:
Listen to how all of the high-end frequencies are gone because of this filter. The guitar has lost its body and sounds brittle.
Electric Guitar with High Shelf filter of -5 dB applied at 1 kHz:
Listen to how the guitar sounds like it has a blanket over it as the upper frequencies have been pulled down but are not gone like with the low-pass filter.
Electric Guitar with Low Shelf filter of -5 dB applied at 1 kHz:
Listen to how the guitar sounds like it has 'lost weight' because of the reduction of the lower frequencies, but they are not gone as with the high pass filter.
Electric Guitar with Bell filter of -5 dB applied at 1 kHz:
Compare this to the raw sound and listen to how some of the grit of the guitar sound is lost - you can hear the lows and highs well, but the middle tones have been diminished by the bell filter.
Electric Guitar with Band Pass filter applied at 1 kHz:
Listen to how the guitar has lost its top and bottom as the band pass only lets sounds by that are close to 1 kHz. (Hint: This is the area of sound that was being pulled down by the bell filter.)
Why Do We EQ? Solving the 5 Core Mix Problems
Equalization is not about making every instrument sound "huge" in solo. In fact, if every instrument sounds huge in solo, your mix will sound like an illegible wall of noise when played together.
EQ solves five specific acoustic problems inside a session:
Frequency Masking: Carving unique pockets so instruments stop clashing.
Mud & Boxiness: Clearing 200 Hz - 600 Hz sonic clutter.
Harshness: Taming 2 kHz - 8 kHz ear fatigue and sibilance.
Resonances: Cutting unnatural ringing peaks with high-Q filters.
Tonal Balance: Shaping warmth, body, presence, and top-end air.
Problem 1: Unmasking Clashing Instruments (Frequency Pocketing)
Frequency masking occurs when two or more instruments occupy the exact same frequency band at the exact same time. The louder or denser instrument "masks" (hides) the quieter instrument, causing it to disappear from the mix.
This happens when there is a room full of people talking and you have a hard time hearing the person right in front of you, but then someone across the room laughs with a high-pitched laugh and you can hear it clear as day! Why? Because your brain turns down sounds that fight with each other as background noise and it turns up sounds that stand out as attention items.
Rather than turning the hidden instrument up on the volume faders (which just overloads your master bus), use EQ to carve out complementary frequency pockets.

Resolving the Low-End War: Kick Drum vs. Bass Guitar
The kick drum and bass guitar fight over the same sub-frequency real estate (50 Hz - 150 Hz). If both instruments attempt to dominate 60 Hz, both instruments will sound weak as they lose impact fighting against one another.
EQ Strategy A (Sub Kick): If the kick carries the ultra-low sub-thump (50 Hz - 70 Hz), cut that exact region on the bass guitar. In return, let the bass dominate the upper-bass punch (100 Hz - 150 Hz), and notch out 100 Hz on the kick drum.
EQ Strategy B (Punchy Kick): If the bass guitar owns the deep sub-frequencies (40 Hz - 60 Hz), high-pass the kick drum slightly higher (45 Hz) and boost the kick's beater click at 2.5 kHz so it cuts through cleanly.
Clearing the Midrange: Lead Vocals vs. Guitars and Synths
Distorted rhythm guitars, synth pads, and acoustic strumming often dominate 1 kHz - 3 kHz - the exact same region required for vocal clarity.
To make the vocal sit gracefully upfront without turning down the guitars:
Identify the Vocal Frequency: Find where the lead vocal's core presence lives (typically around 2 kHz - 3 kHz).
Add a Gentle Cut: Place a wide, gentle -2 dB bell cut on the rhythm guitars at that exact frequency. The vocal will instantly lock into place as if a curtain was pulled back.
By carving out a little frequency space in the rhythm guitars, the lead vocal should sit in that space while holding the listener's attention instead of fighting with the guitar.
Problem 2: Removing Mud & Boxiness
"Mud" is the ultimate enemy of mix clarity. It accumulates in the 200 Hz - 500 Hz range when multiple instruments stack up their low-mid harmonic build-ups.
If your mix sounds dark, muffled, or lacks depth, resist the temptation to boost the high frequencies. Instead, go through non-bass tracks (guitars, keyboards, snare drums, backing vocals) and apply gentle, wide cuts around 300 Hz. Clearing this low-mid clutter instantly opens up clarity across the entire mix.
While I do not recommend chopping this information off (low-end frequencies contain spatial information useful when you use reverb), making some small adjustments across multiple instruments adds up - give it a try. And remember, different genres of music might need more or less in the low-end - the key here is to keep things sounding clear but powerful at the same time.
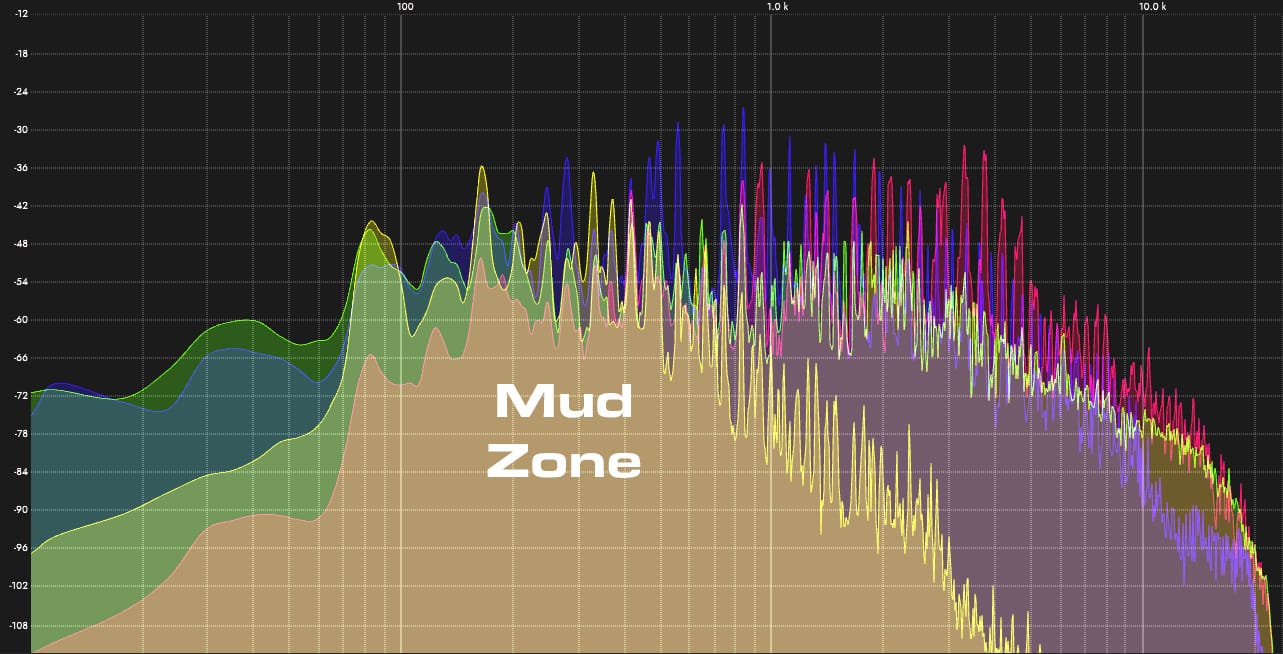
Plugin interface shown: Spectrum 2 by Schulz Audio
Problem 3: Taming Harshness, Sibilance, and Piercing Frequencies
High-frequency harshness causes rapid listener fatigue. Piercing vocal "s" and "t" sounds (sibilance) live between 5 kHz and 8 kHz, while harsh guitar speaker fizz and brassy cymbal bite dominate 2.5 kHz - 4.5 kHz. I mean, nobody really likes the sound of a dentist drill, right?
Using a narrow bell filter to shave off -2 dB to -4 dB in these problem zones calms down aggressive tracks, making them feel smooth and warm without losing articulation.
Problem 4: Fixing Resonances (And Why the "Narrow Sweep Method" Can Harm Your Mix)
A resonance is an unnatural, ringing frequency peak caused by room acoustic anomalies, poor microphone placement, or guitar cabinet physics.
For years, tutorials have recommended the "Narrow Sweep Method": boosting a bell filter by +15 dB with a super-narrow Q factor, sweeping across the spectrum to find ugly-sounding frequencies, and cutting them aggressively.
Warning: The narrow sweep method is a dangerous trap. If you boost any frequency band by +15 dB, it will sound terrible and harsh! Beginners who use this method end up carving dozens of deep, narrow notches out of their tracks, destroying the instrument's natural tone and phase coherency.
The Better Resonance Cut Rule
But there is another problem here: Your brain is really bad at detecting differences when they are gradual. A sweep is a gradual change. Instead, listen for resonances in the context of the song and if you hear one, do your best to estimate the frequency it is coming from. Use a bypassed EQ and notch out that frequency by about -6 dB or so. You are trying to eliminate the distraction, not kill the frequency all together and often this is enough.
Then, turn the EQ on and listen. If you were right on your frequency estimate, the resonance will disappear. If not, then do another bypass guess. This might take a little longer in the beginning, but you will be training your ears for accuracy and you will be giving your brain a sharp contrast to listen to, which makes hearing the difference easier.
Problem 5: Tone Shaping (Adding Warmth, Body, Presence, and Top-End "Air")
Once corrective cuts are complete, it is time to shape the tone of your track. Creative tone shaping adds emotion and polish by adjusting the following:
Adding Warmth & Weight: A broad 1.5 dB boost with a low-shelf filter at 100 Hz adds chest weight to a lean vocal or thin bass.
Adding Presence: A broad +2 dB boost between 2.5 kHz and 4 kHz brings an instrument forward in the mix.
Adding Top-End Air: A smooth high-shelf boost above 10 kHz (or 12 kHz) adds expensive, silky polish to lead vocals, acoustic guitars, and drum overheads without adding harshness.
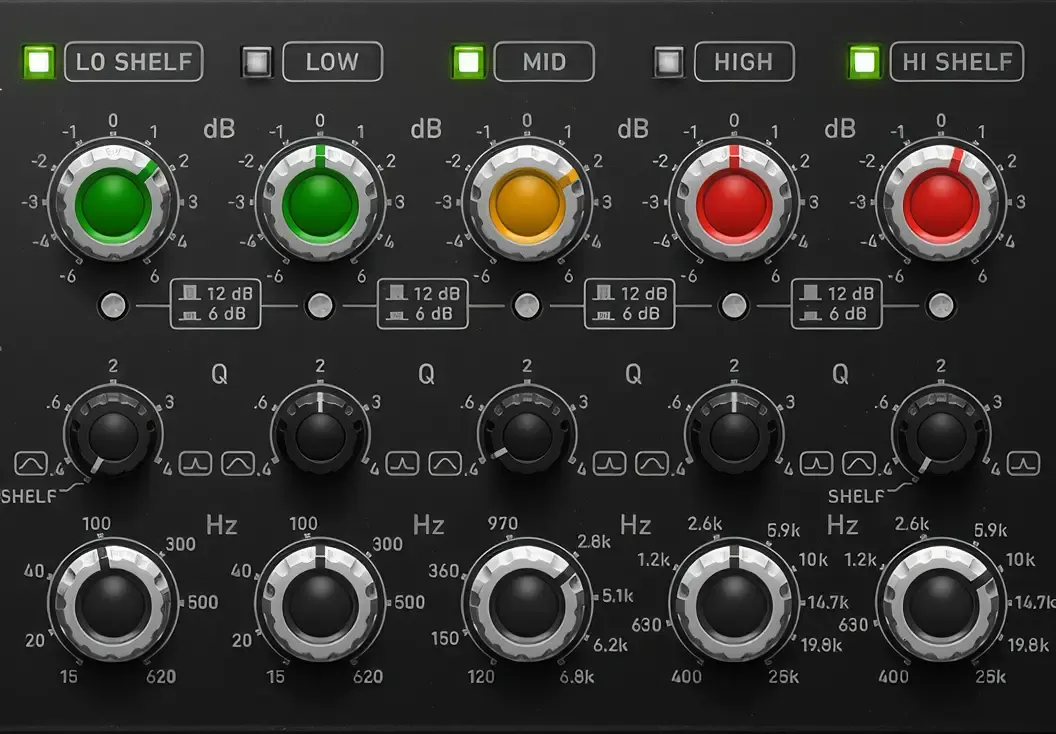
Plugin Interface shown: AMEK 250 by Plugin Alliance
Decoding Types of Equalizers: Digital, Analog, and Beyond
Not all equalizers process audio in the same way. Understanding the strengths and weaknesses of different EQ architectures dictates when to reach for a clean digital tool versus a colored analog emulation.
Here is a list of EQ types, their core strengths, and what they are best used for:
Digital Parametric EQ: Has unlimited bands and a visual graph. Best used for surgical cuts, notch filtering and frequency-specific broader moves.
Graphic EQ: Has fixed sliders across frequency spectrum. Best used for live sound tuning and fast balancing.
Passive (Pultec) EQ: Great for Low-end trick, organic curves. Best used for bass, kick drums, master bus warmth.
Console (SSL/Neve) EQ: Has musical proportional Q and adds saturation. Best used for character tracking and mix buses.
Dynamic EQ: Provides level-dependent frequency cuts (or boosts). Best used for stray sibilance, intermittent mud, and light envelope shaping.
Linear Phase EQ: Has zero phase shift across bands. Best used for mastering, multi-mic drum grouping.
Parametric EQ: The Modern DAW Workhorse (Surgical Precision)
A parametric equalizer provides total continuous control over every variable: frequency selection, gain, and Q factor across unlimited bands, usually displayed over a real-time Spectrum Analyzer (FFT).
When to use: Use digital parametric EQs (like FabFilter Pro-Q or stock DAW EQs) for surgical cleaning, high-pass filtering, resonance removal, and precise unmasking.
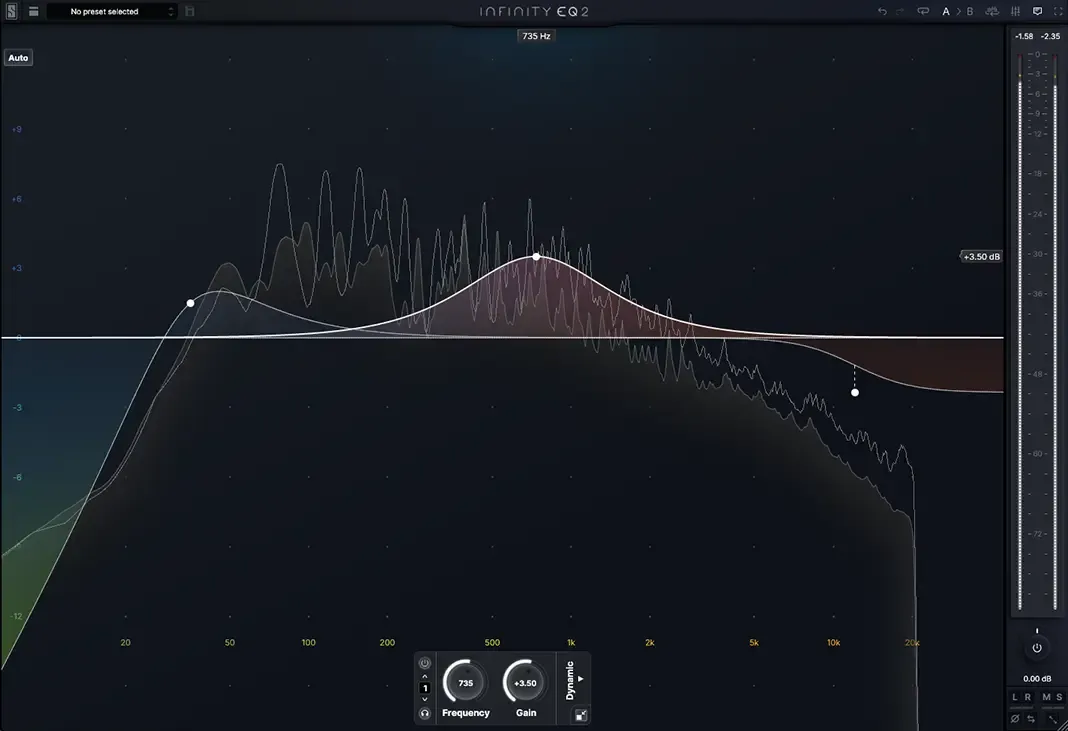
Plugin Interface shown: Infinity EQ2 by Slate Digital
Graphic EQ: Fixed Frequency Bands for Quick Balance & Live Sound
A graphic equalizer breaks the audio spectrum into fixed frequency bands (typically 10, 15, or 31 bands) controlled by vertical volume sliders. The Q factor for each slider is fixed.
When to use: Widely used in live sound reinforcement to tune PA systems to a room, or on bass guitar rigs for rapid visual tone adjustment.
Fun Fact: Back in the 80s and 90s, it was not uncommon to find simple graphic equalizers built in to boom boxes or stereo systems.
Analog Emulation EQs: Character, Color, and Musical Curves
Unlike surgical digital EQs, vintage analog EQs were designed with physical electronics (vacuum tubes, transformers, inductors) that introduced pleasant harmonic distortion and musical phase curves. This saturation from the circuitry colored the output sound in different ways and in varying degrees.
Long before the days of digital plugins and digital analog emulations, the world was running real analog hardware with real cables and electrical components. The character that these units imparted was critical to the sound of those ages and is still treasured today.
Famous analog EQ units include:
The Pultec EQP-1A: Can boost and attenuate (cut).
Baxandall EQs: Very gentle shelf EQs.
British Console EQs: Neve, SSL, and API all have their own character.
Pultec EQs (EQP-1A): The Low-End Trick & Passive Curve Magic
The passive Pultec EQP-1A is legendary for its unique filter interaction. It features separate knobs for boosting and attenuating the low end at the exact same frequency (e.g., 60 Hz).
The Pultec Low-End Trick: Logic dictates that boosting and cutting 60 Hz simultaneously would cancel each other out. But due to physical circuit design, the boost filter has slightly higher gain than the cut filter, and the cut sits slightly higher on the frequency spectrum.
This creates a massive, tight sub-boost combined with a gentle notch above it (600 Hz), removing boxiness while delivering a legendary low-end thump for kicks and bass guitars!
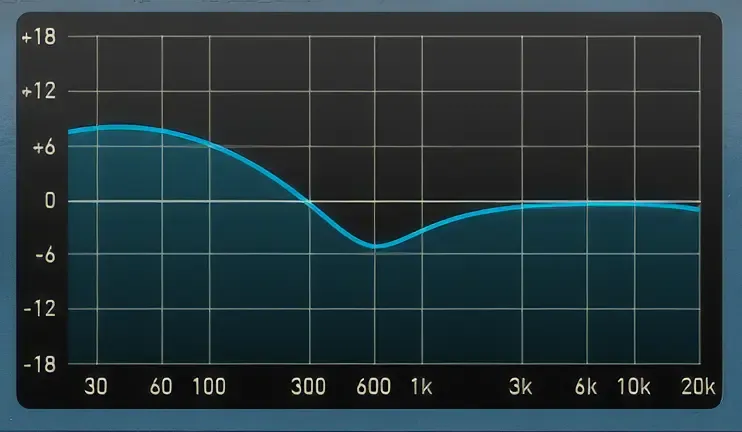
Plugin Interface shown: Gem EQP by Overloud with 60 Hz +6 Boost & -6 Atten
Listen to the difference between this exact Pultec move on a kick:
Raw Kick Sound:
Kick with Pultec +6 Boost & -6 Attenuation @ 60 Hz:
Baxandall EQs: Ultra-Smooth Shelves for Master Buses
Designed by Peter Baxandall, this circuit topology uses extraordinarily wide, gentle shelf slopes. Adjusting a Baxandall high-shelf at 10 kHz subtly affects frequencies all the way down into the midrange without phase distortion or harshness.
When to use: Ideal for master buses, mix buses, and acoustic instruments where broad, musical tone adjustments are required.

Plugin Interface shown: Dangerous BAX EQ by Plugin Alliance
British Console EQs (Neve 1073 & SSL Channel Strips)
Console EQs built by Neve, SSL, and API shaped decades of iconic records:
Neve 1073: Famous for its fat, rich transformer saturation and smooth high-shelf filter (12 kHz).
SSL E/G Series: Famous for aggressive, snappy mid-range sculpting with switchable Black and Brown knob filter profiles.
API 550A/550B: Uses a "Proportional Q" design - the more you boost or cut, the narrower the Q factor automatically becomes.
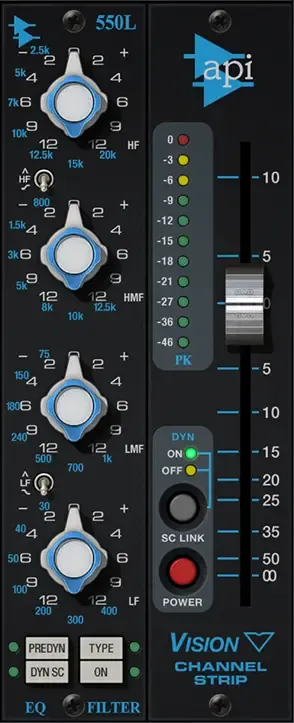
Plugin Interface shown: API Vision Channel Strip (550) by Universal Audio
Dynamic EQ vs. Static Parametric EQ: When to Use Dynamic Suppression (or Boosting)
A standard static EQ applies the exact same boost or cut 100% of the time. A Dynamic EQ combines the surgical control of an equalizer with the threshold-based intelligence of a compressor.
A dynamic EQ band stays completely flat until incoming audio crosses a set threshold. Only then does the band boost or cut.
Compare the difference in behavior between a static and dynamic EQ:
Static EQ: Holds a constant -4 dB cut at 3 kHz. This weakens vocal tone even when the sound level is soft.
Dynamic EQ: Has a flat response until the singer's volume rises above a threshold, then applies up to a -4 dB cut at 3 kHz.
When to use: Perfect for intermittent problem frequencies - such as a singer who only gets harsh on loud notes, or a bass guitar that only booms on specific low notes.
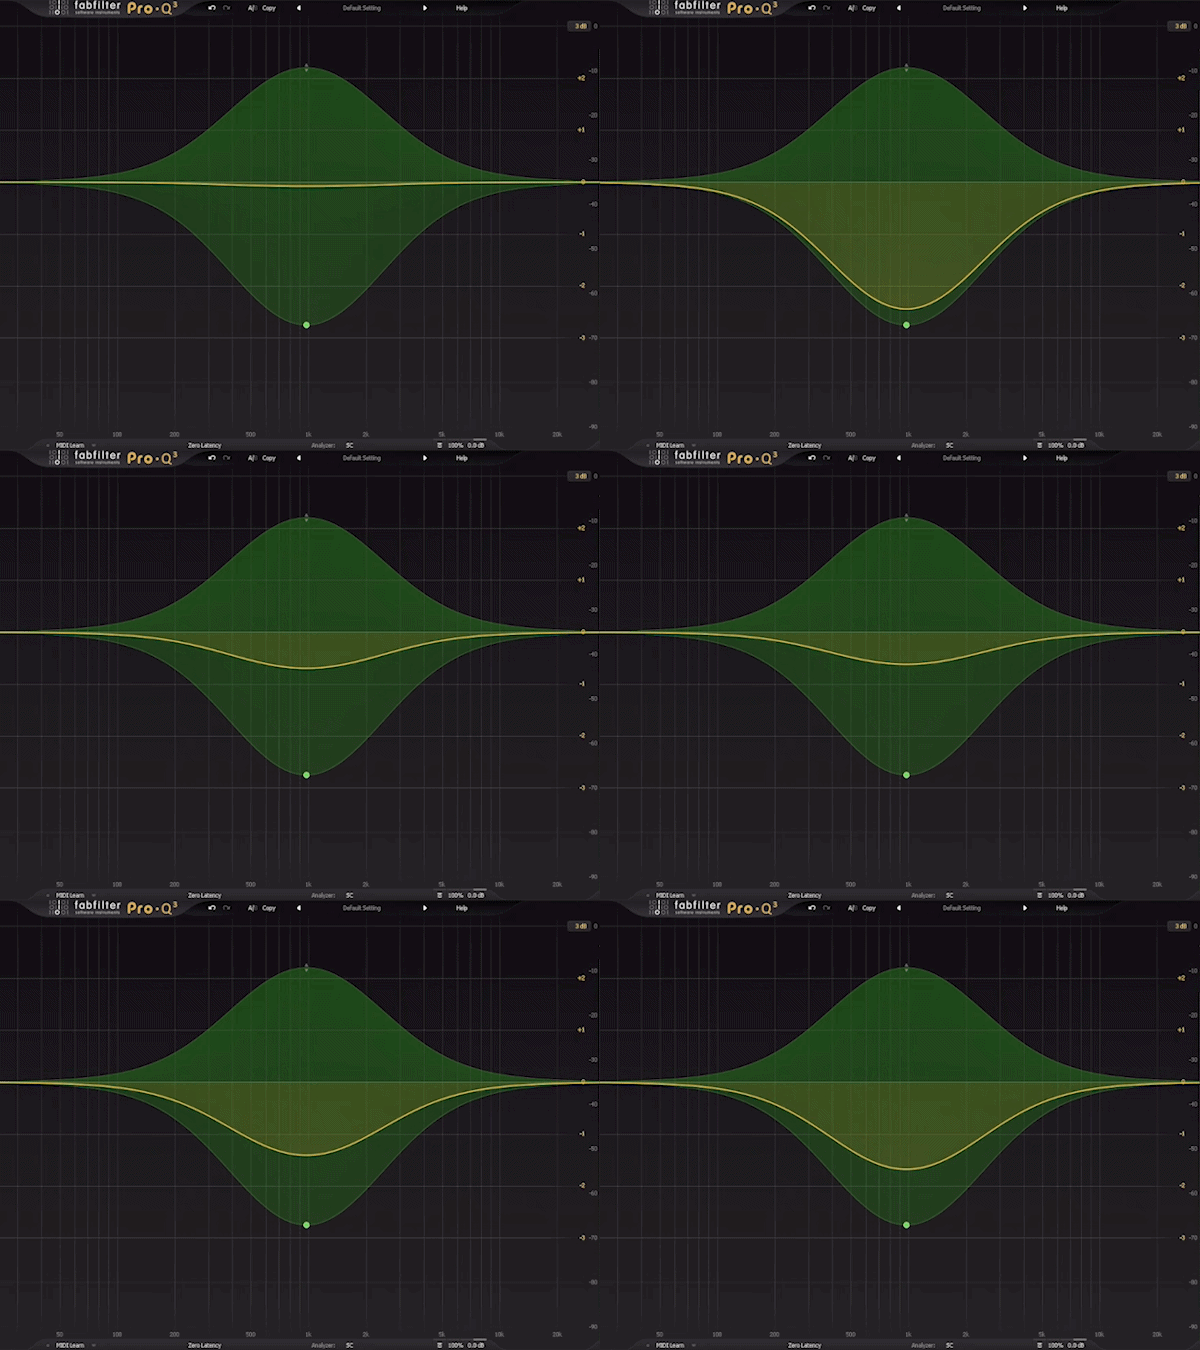
Plugin Interface shown: FabFilter Pro-Q3 with a dynamic EQ in action.
Linear Phase EQs vs. Minimum Phase EQ: Phase Distortion vs. Pre-Ringing
Standard digital and analog EQs (Minimum Phase) introduce microscopic time delays (phase shifts) around the frequencies being adjusted. While usually imperceptible, this phase shift can weaken transient punch or cause comb filtering when combining multi-miked tracks (like a snare top and bottom mic).
Linear Phase EQs process audio without introducing phase shift, keeping all frequencies perfectly aligned in time.
The Trade-Off: Linear Phase processing requires significant latency and introduces an artifact called "pre-ringing" - a faint, smeared pre-echo before sharp transients (like kick and snare strikes).
Rule of Thumb: Use Minimum Phase EQs for standard mixing and drum tracks. Save Linear Phase EQs for mastering or parallel processing where phase alignment is critical.
A Word About Minimum Phase EQ
When you are working with EQs, you will eventually start to run into these terms that we just talked about: linear phase EQ, minimum phase EQ, EQ phase shifting ,etc.
I want to take a moment and talk about why this is important. Buckle your science seatbelts, because this is where we actually talk about the electronic behavior inside the EQs to tell you why this stuff is important.
Why Phase Shifts are Required in EQs
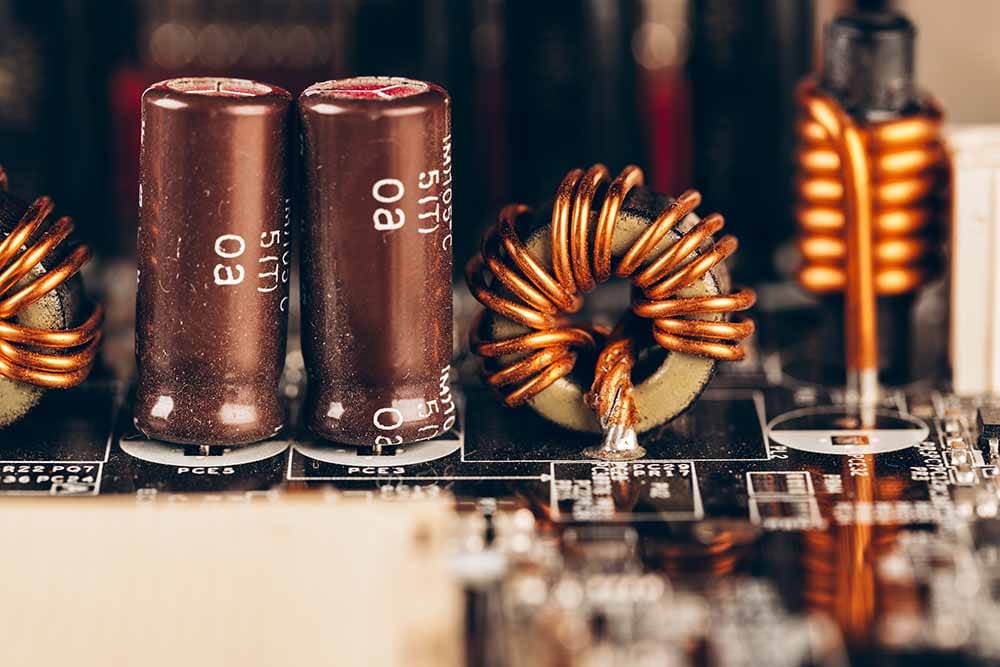
Inside the circuitry of analog EQs, inductors and capacitors are used to alter the volumes of different frequencies. These components have a property called Reactance which essentially behaves like a frequency-dependent resistance.
Capacitors (C): Block low frequencies but let high frequencies pass.
Inductors (L): Block high frequencies but let low frequencies pass.
If you wire these components together inside of an EQ, the equalizer can use this LC network to act like a frequency traffic cop. If you want to cut a high frequency, the EQ uses a capacitor to route those specific high frequencies away from the main output, lowering their volume. If you want to boost a frequency, the EQ can have these components wired inside the feedback loop of an amplifier - this basically tells the amp to work harder only at the frequencies the LC network lets through.
But capacitors and inductors do not transmit electricity like a wire does - they physically store and release energy. And because of this storage and release function, the resulting electrical voltage ends up being slightly out of sync with the original audio signal. Why? Because it takes time to both store and release energy from these components.
And this time delay causes a phase shift, which is a shift in the timing of the audio waveform. You cannot use inductor and capacitor components to shape frequency volume without suffering from a time delay - it's the Laws of Physics in action.
What Phase Means in EQ
So, why is understanding phase important when using EQs? Because depending on which stage of the music production process you are in, it can affect your results differently.
This phase shift may not matter so much if you are dealing with an isolated instrument track that is not correlated to other tracks. But let's say you wanted to EQ a snare drum and you had top mic and bottom mic tracks - they have a phase relationship that is important.
Let's assume you have that phase = timing relationship set where you liked it for the combined snare sound, but then you put an EQ on the bottom snare and made some changes. If that EQ is shifting the phase, you can actually un-align those two tracks - and that means that phase relationship gets broken.
Additionally, if a steep EQ move was used that introduced a heavy phase shift, the drum transients can lose their focused "snap" as they get time-smeared.
If you use a gentler EQ, that smearing might turn into a smooth musical "glue." If you use a linear phase EQ, the punch remains mathematically perfect but the cost of forcing that adjustment can make the low end feel a bit sterile or detached, not to mention the "pre-ringing" issue we talked about before.
How to Deal with EQ Phase Shifting
Now this may all sound like it is super noticeable stuff that will completely break your mix, but that is not necessarily true. However, it is a way to think about how you choose which EQ you are going to use.
Most music producers that aren't armed with this information just grab any EQ - an EQ is an EQ after all, right? Wrong!
In the next section, we will go over some practical use cases of EQs. Pay attention to whether an EQ is being used at a track or a song / bus level. That is one key determination of which ones you might want to use.
An EQ that pushes the phase shifting heavily may not be the best to use on a master bus or when mastering. In the end, let your ear be your guide - play with different EQs and see if you hear how they make your song feel.
Do your drums lose some of their punch?
Does your song sound more glued and is that better or worse for you?
Are you dealing with any paired sounds, like the top/bottom mic of a snare drum?
Now that you are armed with this information, you likely know more about how to work with the phase effects of EQing than many music producers. And that means it is time to get into some specific use cases for EQ work.

Practical Instrument EQ Guides
Use these target frequency starting points as a roadmap for carving out spaces across your mix:
How to EQ Vocals
The lead vocal is the focal point of modern music. It must sound upfront, full, and articulate without fighting the instrumental.
When EQing lead vocals, here is a great place to start:
Low Shelf: Put a -6 dB low shelf around the 80 Hz - 100 Hz range. This will help dampen floor rumble, mic handling noise, and some pop plosive impacts while retaining spatial information in the recording.
Clear the Mud & Boxiness: Dip around -2 dB in the 300 Hz - 400 Hz range to clear some mud. If the vocal sounds like the singer is singing inside of a cardboard box, cut around the 600 Hz - 800 Hz range.
Fix Nasal Tone & Sibilance: Tame honky or nasal vocals by testing a cut between the 1 kHz and 2 kHz range. If harsh sibilance ("s" sounds) are in the recording, shave that off with appropriate cuts in the 5 kHz to 7 kHz range.
Add Presence & Air: Apply a wide, smooth boost of about +1.5 dB across 3 kHz - 4 kHz to bring the singer forward a bit in the mix. Add a high-shelf boost at 10 kHz for some expensive top-end air.
Pro Tip: Remember that different vocals will have different key frequencies to enhance their presence. A female soprano should be treated differently than a male tenor - they simply have different pitches that will make their voices more present to the ear.
How to EQ Drums (Kick, Snare, Toms, Overheads)
Drums are a complex instrument from a tonal standpoint because different parts of the drum set need to be handled differently. If you pull up the low-end on the whole set, the kick might sound cooler but the snare and cymbals will sound poor.
When dealing with drums, it is a good idea to treat the different tonal parts of the kit separately.
EQing the Kick Drum: Bringing out the Thump & Click
The kick drum has become the primary rhythmic driver of modern music. It needs to sound solid, impactful, and clear.
When EQing a kick drum, here is a great place to start:
Low Shelf: Put a -6 dB low shelf around the 45 Hz range. This will help to pull down the rumble to keep the kick clear.
Boxiness Cut: Put a pretty strong cut in the 300 Hz - 400 Hz range to eliminate hollow-sounding 'cardboard box' tones.
Beater Click: Put a boost of about +2.5 dB across the 3 kHz - 5 kHz to help bring out the click of the kick drum beater. This can be adjusted to taste, depending on the genre you are working in.
What About Air: When you are working with a kick drum, air does not typically come into play. So, no air needed here.
EQing the Snare Drum: Balancing Body & Crack
The snare drum is the counter-rhythm element to balance the kick. While a kick can stylistically vary across songs, it needs to sound crisp, impactful, and attention-grabbing.
When EQing a snare drum, here is a great place to start:
Low Shelf: Put a -6 dB low shelf around 80 Hz. This will help to pull down any low tones that might fight with the kick.
Body / Weight: Add a boost in the 100 Hz - 200 Hz area to thicken up the body of the snare and add weight to the hit.
Cut Ringing Tones: Use a cut between 400 Hz and 700 Hz to bring down any ring in the snare tone.
Snap / Crack: Boost 3 kHz - 5 kHz to emphasize the hit of the stick on the drum.
Cymbals & Overheads: Cutting Harsh Brass Without Dulling the Kit
Cymbals are excellent for impact moments, but they are also quite high-pitched and making them sound great means not too bright and not too dull. Cymbals need to sound clear, shimmery, and pleasant.
When EQing cymbals, here is a great place to start:
Low Shelf: Put a -6 dB low shelf somewhere between 80 Hz - 500 Hz, depending on if the drum overheads are being used to capture the whole kit dimensionally or just the cymbals.
Cut Brass Harshness: Use a cut to shave the piercing cymbal harshness between 3 kHz and 4.5 kHz.
Sizzle in the Air: Use a smooth high-shelf boost above 10 kHz to add nice brightness to the cymbals.
How to EQ Bass (Sub-Bass, Electric Bass, Synth Bass)
The bass guitar or synth bass tend to overlap with part of the kick drum frequency range. Because of this, you may need to adjust the body weight boosting that you put into place on these instruments.
When EQing a bass guitar, here is a great place to start:
Low Shelf: Put a -6 dB low shelf around 35 Hz. This will help to leave headroom for any sub-bass content and eliminate rumble.
Fortify Low Tone: Adding a boost between the 60 Hz - 90 Hz range can add low weight to a bass guitar tone.
Remove the Mud: Cut between 200 Hz and 400 Hz to clean up mud and leave space for guitars and other instruments.
Note Articulation: Boost 800 Hz - 1.5 kHz to emphasize the fret pick attack and finger growl, ensuring the bass remains audible on mobile phone speakers and so its notes are more clearly heard.
How to EQ Acoustic & Electric Guitars (Leaving Space for the Vocal)
Acoustic and electric guitars tend to overlap with part of the lead vocal frequency range. Because of this, care should be taken when getting the vocals and the guitars to play well together while still being clearly heard.
When EQing a guitar track, here is a great place to start:
Low Shelf: Put a -6 dB low shelf around 90 Hz - 120 Hz for electric guitars and 100 Hz - 150 Hz for acoustic guitars. Guitars typically are not leaning into sub-bass territories.
Body & Boom: Cut boomy acoustic guitar buildup around 200 Hz - 300 Hz and remove some mud while you are at it.
Vocal Pocket Cut: Place a gentle and wider -2 dB cut on rhythm guitars at 2.5 kHz to leave room for the lead vocal.
Mastering EQ vs. Mixing EQ: Broad Strokes vs. Surgical Fixes
At some point in your music journey, you will come across an EQ that is called a mastering EQ. It is easy to assume an equalizer is an equalizer regardless of where it sits in your session, but using an EQ on an individual track during the mix stage requires a fundamentally different mindset - and toolset - than using an EQ on a full stereo mix bus during mastering.
Here is the difference between mixing and mastering EQs:
Mixing EQ (Primarily Individual Tracks): These are surgical and micro-focused. Typically, they are used for larger movements (up to 12 dB or more). These EQs tend to fix isolated instrument flaws. Minimum phase digital plugins work well here.
Mastering EQ (Stereo Bus): These are broad and macro-focused tools. They are used for subtle shifts (0.1 to 1.5 dB, for example). They are used to shape the overall tonal balance of a song. Linear Phase and Baxandall EQs work well here.
Mixing EQ: The Surgical Micro-Level
When you are mixing, you are dealing with isolated audio tracks that often contain raw, unpolished technical flaws. Here, EQ is used as a micro-tool to fix specific problem areas without worrying about how your moves impact other instruments on that channel strip.
In a mix session, it is completely normal to execute aggressive, surgical moves:
Slapping a steep -24 dB/oct high-pass filter at 120 Hz on an electric guitar to kill amp rumble.
Carving out a deep -8 dB notch to destroy a ringing snare drum cabinet resonance.
Applying hard subtractive dips to carve out frequency space for clashing elements.
Because you are working on single elements, mixing EQ focuses on isolation and problem-solving.
Mastering EQ: The Broad Macro-Level
Mastering is the art of final polish, translation, and macro-tonal balance. When an equalizer sits on the master bus, every tweak you make affects everything in the song simultaneously. If you boost 3 kHz to add bite to the lead vocal on a master bus, you are also adding bite to the snare drum, the electric guitars, and the cymbal bleed at the exact same time.
As a result, mastering EQ relies on ultra-subtle adjustments and wide, musical curves:
Broad Strokes over Narrow Cuts: Adjustments are usually made using very low Q factors (wide bandwidths) or smooth shelf filters (like a Baxandall circuit).
Fractional dB Adjustments: A move of +0.5 dB or +1 dB on a master EQ is considered a significant change. If you find yourself needing to cut or boost by -4 dB on a master bus, that isn't a mastering issue - it means the mix itself is broken and needs to be fixed at the track level.
Phase Preservation: Mastering engineers frequently opt for Linear Phase EQs or high-end passive analog designs to prevent shifting the phase alignment or smearing the transient punch of the stereo mix.
The Golden Rule: Use Mixing EQ to fix individual instrument problems with surgical precision; use Mastering EQ to gently tilt the tonal balance of the entire record with broad, transparent strokes.
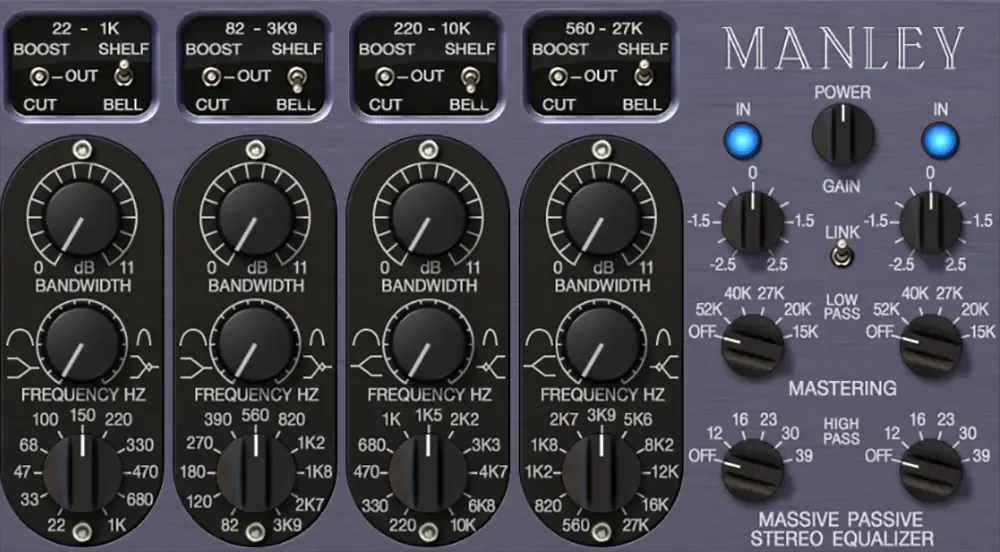
Plugin Interface shown: Manley Massive Passive Mastering EQ by Universal Audio
EQ Signal Flow
Signal flow pertains to the order in which different processing is used. The question of where in the signal flow your EQ moves should be placed is a good one. And it brings us to one of the most debated questions in music production: EQ before compression, or EQ after compression?
Should You EQ Before or After Compression? (The Decision Framework)
Realistically, this question is pretty silly. It points to the human behavioral nature of needing to have a winner all the time - a best. But the real winner here is the music producer that realizes that there is no binary rule in play here - you just need to ask a question...
Ask yourself: "Am I trying to correct some element of the sound of this track, or am I trying to shape the final tone?"
If Correction: Drop the EQ before the compressor. When you correct first, you reduce the risk that the compressor magnifies problem areas.
If Tone Shaping: Drop the EQ after the compressor. When you have your compression set, you can use the EQ to shape the final tone of the sound.
The Ultimate Rule: Use EQs Before and After!
"Break the rules," man - use an EQ both before and after compression.
First EQ (Before Compression): Perform subtractive cutting to clean up the sound. Cut sub-rumble, resonances and mud before your audio hits the compressor so those unwanted frequencies aren't either amplified or trigger unnecessary gain reduction.
Compression: Leveling or groove control applied.
Second EQ (After Compression): Perform additive tone shaping here. Add high-shelf air, presence, or broad warmth to the controlled track. Make shifts to adjust the spectral balance of the sound.
Now, let's get into steps you can take to dial the EQ in for your mix.
The 5-Step Method for Dialing in an EQ on Any Track
When you are working to EQ your tracks, having a straightforward process can help to make decisions easier and save you time.
Here is a five-step process to dial in the EQ of your song:
Step 1: Clean the Bottom End: Use a low-shelf to reduce non-bass instrument low end and unnecessary sub-energy. If more drastic moves are necessary, consider using a high-pass filter.
Step 2: Perform Subtractive Cuts in Context: Identify and cut mud (200-500 Hz) and harshness (2-5 kHz) on tracks while listening to the full mix (never in solo).
Step 3: Carve Pockets for Clashing Elements: Cut complementary bands between competing tracks (e.g., Kick vs. Bass, Guitars vs. Lead Vocal).
Step 4: Add Broad Tonal Boosts: Apply gentle, low Q, wide bell or shelf boosts for presence, warmth, or air.
Step 5: Level Match and Bypass Test: Match output volume and toggle bypass to verify the mix actually improved. This is a really important step, but volume balancing takes any loudness bias out of the equation so you can make good decisions.
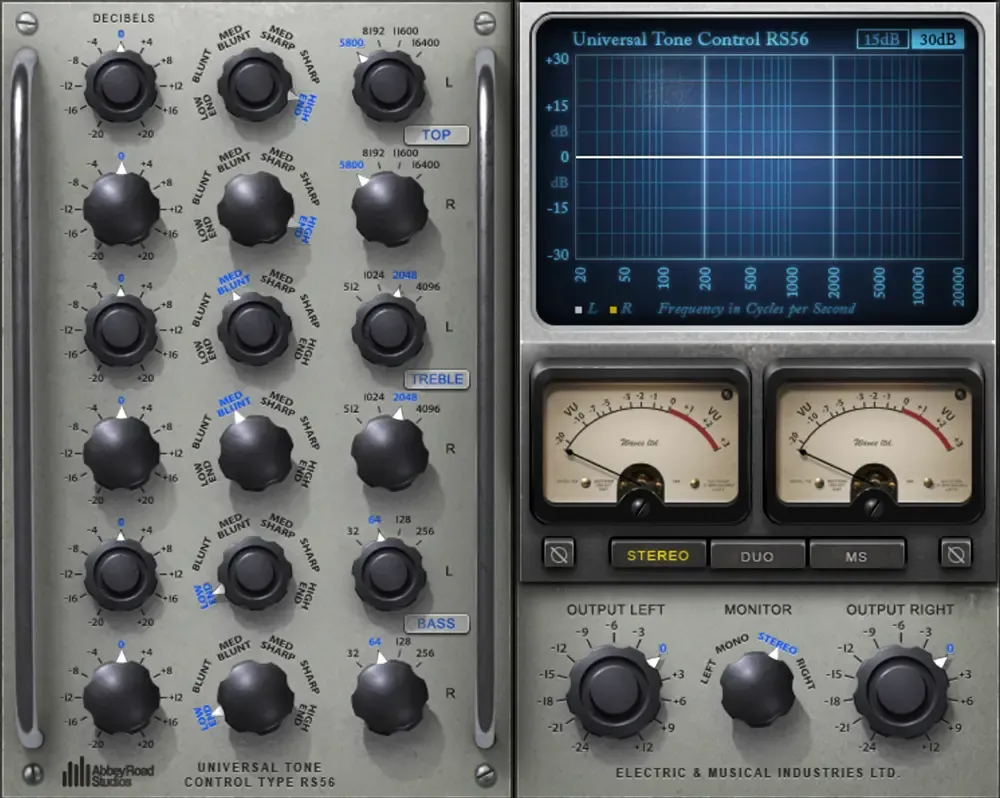
Plugin Interface shown: RS56 Stereo EQ by Waves
Mixing in Context: Why EQing Solo is Ruining Your Mixes
The "Solo" button is the biggest trap in modern mixing.
When you solo an acoustic guitar, you will naturally want to boost the low end to make it sound big and full on its own. But when you un-solo the track, that extra low end will instantly clash with the bass guitar and kick drum, muddying up your entire session.
Rule of Thumb: Perform initial technical cleaning (cutting mic hum or harsh resonances) in solo if necessary, but always dial in your creative cuts and boosts while listening to the full mix playback. You are mixing a song - not a collection of isolated tracks!
This is not to say that you will never solo a track to make an EQ move, but rather to say that process should be rare. If I need to track down a squirrely resonance that is sticking out in the mix but I'm having trouble hearing exactly where it is, soloing can help to confirm a) which track is responsible, and then b) the frequency of that resonance.
But I am making my cuts on that resonant frequency in context with the rest of the song playing.
Why Loudness Bias Messes with Your Ears
Humans like sounds that are louder - period. Because of that, you might make an EQ move and think it sounds better right away. But what if the EQ was just turning up the volume and you like it because it was louder, not because it was better?
The way to fight against this is by loudness-matching a before and after and giving yourself an A/B test. When you eliminate the loudness bias, your ears are left with a real decision about the move that was made: it either moved the mix forward or it did not.
Be honest with yourself and take the small amount of extra time needed to loudness balance your A/B tests. The more you do it, the faster you will become at locking in meaningful mix moves.
Common EQ Mistakes That Ruin Mixes (And How to Avoid Them)
When it comes to EQ moves, there are several common mistakes that can ruin your mix.
These are four common EQ mistakes:
Mistake 1: Over-Filtering and Aggressive High-Pass Filters
Mistake 2: Boosting Narrow Bands Instead of Cutting Problem Frequencies
Mistake 3: Over-Searching for Resonances with High-Q Sweeps
Mistake 4: Trying to EQ Volume Problems
Over-Filtering with Aggressive High-Pass Filters
A common piece of bad advice is "high-pass everything except kick and bass at 100 Hz."
If you apply steep 24 dB/oct high-pass filters to every single track, you introduce phase ringing and strip away the natural low-mid warmth of your song. Your mix will quickly sound thin, sterile, and hollow. High-pass filter with gentle slopes (6 dB/oct or 12 dB/oct) and only cut as high as necessary. Or, better yet, use a low-shelf to control how much low-end is in play.
Pro-Tip: The low-end carries spatial information that our brain uses to place sounds on the soundstage. High-pass filtering kills this information.
Boosting Narrow Bands Instead of Cutting Problem Frequencies
Boosting with narrow Q factors introduces ugly phase distortion and harsh frequency spikes. Remember: Cut narrow, boost wide.
If you find yourself reaching for an EQ to boost part of a frequency, remember to check the volume balance of the instrument in the mix and verify that frequency masking is not happening with another track.
Then, when you are going to make a boost, use a nice, low Q, wide movement while listening in context with the rest of the mix.
Over-Searching for Resonances with High-Q Sweeps
As I previously mentioned, sweeping +15 dB narrow boosts across a track will make every frequency sound like an annoying resonance. Only make surgical cuts if a problem frequency is genuinely distracting your ears during normal playback.
And by normal playback, I mean in the context of the mix. Everything has little 'ugly spots' if we zoom in far enough, so don't distort your perspective on the mix by going micro here.
Trying to EQ Volume Problems
If a vocal is buried in the verse, don't throw a massive +6 dB mid-range EQ boost at it. That is a volume level, volume automation or compression problem, not an EQ problem!
Use volume faders and automation to handle macro level changes before reaching for equalizers and save yourself lots of frustration. When the volume balance is locked in, you may find that your EQ work lessens.
Frequently Asked Questions
How Do I Fix a Muddy Mix?
"Mud" in a mix is normally associated with the low-mid frequencies roughly around the 200 Hz - 500 Hz range. Typically, a mix gets muddy when there is sonic information from multiple instruments all building up in the same area. One way to address this is to pull down those frequencies by about 1-2 dB across each of the instruments.
My Mix Sounds Muffled - What Do I Do?
When a mix sounds like a blanket has been thrown over it, an EQ boost around 2 kHz - 3 kHz will normally help to brighten things up.
Why Use an Analog EQ Plugin?
Analog EQ plugins can add musical saturation in addition to the EQ moves that are made. This is one of the ways to approximate what it would sound like running through real circuitry. The non-linear effect of that circuitry tends to make music sound better.
My Vocal is not Sitting in the Mix - Why Not?
If you have EQ'd your vocal and it sounds good from a tonal standpoint but it is not sitting right in the mix, then check the volume and the dynamic range of that track. If the vocal is just too quiet, bringing it up will help it sit where it needs to. But if the vocal is dancing around and quiet sometimes while louder others, then leveling control through compression is the fix.
Your Next Steps
Equalization is not about memorizing magic numbers or blindly copying frequency cheat sheets. It is an exercise in acoustic spatial awareness - carving out distinct physical locations for every instrument so your entire track breathes with clarity, power, and depth.
Train your ears to spot mud in the low-mids, tame harshness in the upper-mids, and prioritize subtractive cuts over additive boosts. Always sculpt your instrument tones in context with the full mix, leverage the colored warmth of analog emulations when character is needed, and let your ears guide your choices.
Now fire up your DAW, open up an EQ, carve out some space, and take total control of your frequency spectrum!
Found this guide helpful?
Spread the word and share with another creator.
Return to Plugins & Processing Topic Hub
Next Topic >
About the Author

Jim is the creator of Embervane - a lifelong music maker with a curiosity‑driven approach to creativity and learning. He has been playing drums since age nine and composing seriously since 2018, continually refining his craft through study, experimentation, and hands‑on practice.
With a background in chemistry and more than two decades of studying behavioral psychology, Jim brings a unique blend of scientific thinking and human understanding to music education. He beta‑tests tools for companies like Mastering the Mix, Kit Plugins, and Soundiron, which keeps him close to the evolving landscape of modern production.
Jim isn’t a celebrity producer or award‑winning engineer - he’s a creator who remembers exactly what it feels like to struggle, learn, and grow. His mission is to help other music makers build clarity, confidence, and momentum in their craft.
Jim is the creator of Embervane - a lifelong music maker with a curiosity‑driven approach to creativity and learning. He has been playing drums since age nine and composing seriously since 2018, continually refining his craft through study, experimentation, and hands‑on practice.
With a background in chemistry and more than two decades of studying behavioral psychology, Jim brings a unique blend of scientific thinking and human understanding to music education. He beta‑tests tools for companies like Mastering the Mix, Kit Plugins, and Soundiron, which keeps him close to the evolving landscape of modern production.
Jim isn’t a celebrity producer or award‑winning engineer - he’s a creator who remembers exactly what it feels like to struggle, learn, and grow. His mission is to help other music makers build clarity, confidence, and momentum in their craft.


©2026 Embervane LLC. All rights reserved. Embervane™ is a trademark of Embervane LLC.