
How to Write a Song: A Step-by-Step Guide

The Myth of the "Magic Spark" (How Write a Song and Beat the Blank Screen)
Let’s dismantle a huge lie right away: professional producers and songwriters do not sit around waiting for a bolt of lightning from the universe to strike them with a fully formed masterpiece.
If you sit down at your computer waiting for a "magic spark" before you click a single button, you’re going to spend a lot of time staring at a blank DAW screen, feeling overwhelmed, and wondering if you "have what it takes."
That blank screen is intimidating. But learning how to start writing a song isn't about raw genius - it’s about having a repeatable, step-by-step process. When you break the music-making journey down into small, bite-sized tasks, the intimidation disappears. You stop overthinking and start building momentum.
This is all part of making music on your computer - it is about taking action and moving forward to fight indecision. Through that, the momentum of your habits will grow.
In this guide, I’m going to walk you through how to build your first song. This means busting that 'blank screen & waiting for an idea' mental tar pit and learning how to build core music-making habits.
It's go time!
Prefer to watch or listen? Check out the video below, or continue reading below for the full deep-dive guide.
Step 1: Setting Up Your DAW (The Blank Canvas)
Before you throw down a single note or play a chord, you need to eliminate technical friction. Technical friction is doing stuff that is not creative in order to prepare to do things that are creative. Nothing kills a creative workflow faster than fighting your software settings when an idea strikes.
Setting up your project file correctly takes 30 seconds, especially if you used a song-writing template, but it sets the stage for a smooth session:
Open a Blank Project
Fire up your DAW (Ableton, Logic, FL Studio, REAPER, GarageBand - whichever software you use, the principles are identical). Let's get that project open so we can get to work.
Set Your Tempo (BPM)
Don't leave it on the default setting just because it loaded that way. Pick a tempo that fits the general vibe of the song you want to create. Here are some example ranges:
Lo-Fi / Hip-Hop: 70 – 90 BPM
Pop / R&B: 90 – 115 BPM
House / Dance: 120 – 128 BPM
Rock / Indie: 110 – 140 BPM
Find the Key of Your Song
If you are wondering how to find the key of a song, keep it simple to start. Pick a clean, accessible key like C Major (all white keys on the piano) or A Minor (also all white keys, but with a darker, moodier feel).
Selecting your key upfront means every note you draw into your MIDI grid will instantly sound cohesive.
If all this talk of keys has you feeling like you're in front of a locked door then maybe brush up your knowledge with some visual, text, and audio examples of how keys and scales work before diving into your melody.
Save and Name Your Project
Don't leave it named Untitled_37. Give it a title, hit save, and establish the habit of an organized producer right out of the gate. (Don't worry - you can change the name of the song later - the purpose of an initial name is to help lock in a general direction for where it is going.)

Step 2: How to Write a Melody That Sticks (And How to Write a Good Song Hook)
Most production guides tell producers to drag in a drum loop and start with a beat. While you can start with any element you want, starting with drums is often a trap.
If you build the rhythm first, you run two massive risks: you get locked into a rigid beat with zero flexibility for melodic movement, or you end up just dragging a static 4-bar drum loop all the way to the right side of your DAW screen and calling it an "arrangement."
The rhythm should support your lead melody - not the other way around. Starting with a melody gives your song its core identity right out of the gate.
Don't believe me? Well figure this - I'm a drummer and I'm telling you to put the rhythm in later is a better habit.
So - melody first in this example. But good news - learning how to write a melody doesn't require decades of ear training. The secret is finding a balance between repetition (which makes a hook memorable) and variation (which keeps it interesting).
Four Essential Rules for Writing a Good Melody
When it comes to writing a good melody or hook, it is easy to get overwhelmed at first. Here are four key points to use a kind of checklist so you can lock in something awesome without spinning your wheels:
Use Your Voice First
Don't start by clicking random notes blindly onto your MIDI grid with a mouse. Loop a simple 4-bar section, hum or whistle along out loud until a catchy 3-to-5-note phrase comes out naturally and then map those exact notes onto your piano roll.
Your voice naturally creates human, singable phrasing. (If you can't map those to notes on the piano roll, just keep your voice recording in for now so you can stay in create mode.)
Step vs. Leap Movement
Move mostly by steps (moving to adjacent notes right next to each other in the scale) rather than huge leaps (jumping across wide intervals). A few leaps add excitement, but too many leaps make a melody sound chaotic and unhinged.
Producers tend to want to jump across many notes, but that isn't how great melodies normally work. Heck, I did the same thing until I built my skills up.
Leave Breathing Room
A melody that plays non-stop notes from bar 1 to bar 8 suffocates the listener. Leave pauses and empty spaces (rests) between phrases. Silence gives your lead room to breathe. Humans don't like empty space - beginners try to fill empty space with lots of notes or words.
Space is as much of a note as a played note is - use it to your advantage.
(Pro Tip: Space also gives you some flexibility in case you need to tweak some notes later.)
Call and Response
Think of your melody like a conversation. Bars 1 & 2 ask a musical "question" (the call), and Bars 3 & 4 provide a musical "answer" (the response) that lands back on a stable tone. This could be with the same instrument or a different instrument.
Listen to some songs that you like and pay attention to the melody - listen for how a sense of call and response might be used. Sometimes the 'call' sits with higher notes, and the 'response' sits in lower notes. Sometimes they use other alterations.
Step 3: How to Write Chord Progressions & How to Write a Bassline (Supporting the Melody)
Now that you have your lead melody locked in, it's time to build the harmony underneath it to give those notes emotional context.
If you feel intimidated by harmony, don't worry. Everyone who is starting out runs into a point where they are fighting against the concept of music theory. But get this - most hit songs rely on a handful of common chord progressions.
A chord is simply two or more notes played at the same time. You can build supporting chords right underneath your melody notes by selecting root notes in your scale and building triads (playing one note, skipping a step, and playing the next).
And spoiler alert! Your melody is already giving you part of the notes you can focus on.
But let's say you just want to try a couple of chord progressions and see how they feel - what should you do if that is the case? Well, here are three to check out. And remember, if these chord progressions don't feel right then change the chords to match the melody by adjusting individual notes. Go for the vibe, not the rules.
Three Plug-and-Play Chord Progressions
Technical chord progressions are normally written Roman numerals (where uppercase = Major chords and lowercase = Minor chords). Pick one of these battle-tested progressions and draw the notes into a Software Instrument track (like a virtual piano or synth pad). If you picked the C Major or A Minor key above, then I have mapped out some examples for you for each progression.
The Pop / Anthem Progression (I – V – vi – IV)
In C Major: C Major ➔ G Major ➔ A Minor ➔ F Major
The Dark / Modern Trap Progression (i – VI – III – VII)
In A Minor: A Minor ➔ F Major ➔ C Major ➔ G Major
The Smooth R&B / Chill Progression (ii – V – I)
In C Major: D Minor ➔ G Major ➔ C Major
Extracting the Bassline (The Easy Hack)
Once you lock in your chords and they are sitting under your melody, adding a bassline takes about five seconds.
Copy the lowest note (the root note) of each chord in your progression, paste those notes onto a dedicated Bass synth track an octave or two lower, and sustain them. Boom - you've just dropped a solid low-end foundation that perfectly locks in with your harmony.
Then, you just play with the rhythm of those notes and you can establish the low-end of the groove, man.

Step 4: How to Make a Drum Beat & Pattern (Locking in the Groove)
With your melody, chords, and bassline playing together, you finally bring in the drums. Because your song already has a melodic shape and emotional direction, the drums don't dictate the song - they just come in to frame and propel what you've already built.
You don't need a complex, hyper-syncopated drum kit right now. You just need a solid 4-bar or 8-bar pattern that locks in with the bassline.
The Foundation
Let's get the foundation of your drum rhythm happening.
Load up a basic virtual drum kit (or stock sampler) in your DAW and lay down these core elements on a grid:
The Kick Drum
This anchors the low-end pulse. Match your kick placement to the energy of your bassline. For modern pop or dance, you might put a kick on every main beat (1, 2, 3, 4). For hip-hop or rock, place a kick on beat 1, with a secondary kick landing where it accents your melodic rhythm.
The Snare / Clap
The snare provides the backbeat that drives the track forward. To start, place your snare or clap cleanly on beats 2 and 4.
The Hi-Hat
Hi-hats provide high-end energy and motion. Draw a simple 8th-note pattern (playing on every beat and every "and" between the beats: 1 - and - 2 - and - 3 - and - 4 - and).
(Pro Tip: If you want to spice things up, skip one of the 'and' notes here and there and see how it affects your overall groove.)
Basic 4-Bar Drum Pattern Layout (16th Note Grid)
If you followed those starting instructions for your drumbeat, your grid pattern should look something like this:
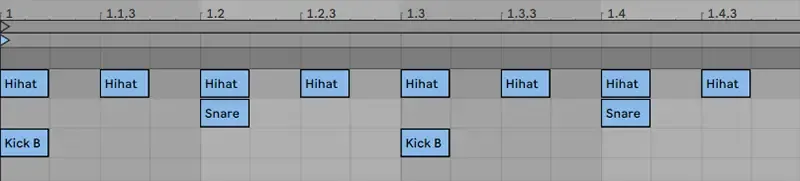
Once that pattern is playing back cleanly, balance its volume against your music tracks so it drives the groove without overpowering your lead melody. If you find it needs adjustment, just go ahead and tweak it a bit - start with the snare and/or Hi-Hat, as the kick is meant to keep that solid foot-thumping beat going.
Here is an example of some simple modifications that start to bring this drumbeat to life:
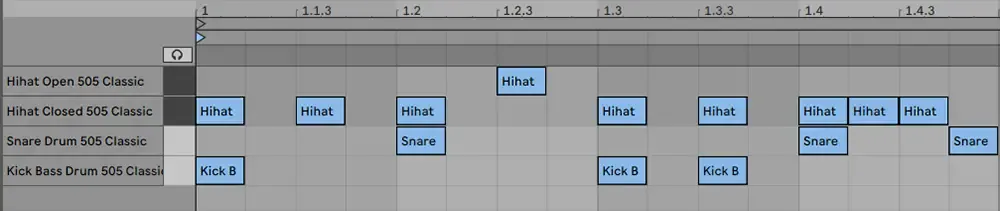
What was done? Not much, really:
An extra kick note was added on the 'and' of the third beat
An extra snare hit was added on the 'ah' of the fourth beat
An extra closed hi-hat hit was added on the 'ee' of the fourth beat
The closed hi-hat hit from the 'and' of the second beat was moved up to an open hi-hat sound.
Small changes like this, when used artfully, can really bring a groove to life without it sounding too busy.
Step 5: Songwriting Tips for Writing Lyrics & Recording Vocals
If you are producing instrumental tracks, electronic beats, or ambient music, you can move straight to mixing. But if you want to add human performance - whether that’s a vocal hook, an acoustic guitar, or a live solo - this is where you lay down live audio.
If recording your vocals feels pretty scary, then just keep it simple. Even recording a 'scratch' vocal take that can be replaced later is better than no vocals, right?
How to Write Song Lyrics Without Getting Blocked
If you want to know how to write song lyrics that don't sound forced, avoid the trap of trying to write deep poetry on line one. Instead, stick with these key elements:
Start with a Central Concept
What is the single emotional core or story of the track? Sum it up in one sentence. That is your vocal North Star, man.
Vowel Sounds & Rhythm First
When writing lyrics for a song, start by singing gibberish vowels over your melody loop to discover where the natural cadence and emphasis land. Yeah - you heard me right: gibberish.
Once you know the rhythmic stress of the melody (e.g., da-DA-da-da-DA), fitting actual words into that pattern becomes infinitely easier.
(In jazz, this was called 'scatting,' where vocalizations were used instead of words, especially when improvising.)
Show, Don't Tell
Instead of writing "I feel lonely," paint a physical picture: "Lying in my bed next to a phone that doesn't ring." Specific imagery connects far deeper than abstract feelings.
(This is not as easy as it seems at first, but showing instead of telling is generally a much better way to go through life.)
Clean Vocal Recording Basics
You can have the best vocals on Earth, but if you can't get them recorded cleanly it won't matter. Here are two things to keep in mind when you are setting up your recording session:
Gain Staging
Ensure your audio interface input level isn't clipping into the red. Aim for your vocal peaks to hit around -18 dBFS to -12 dBFS on your track meter. That might seem low, but it is actually plenty loud for going into your mix.
If the levels are too hot coming in, you risk baking in nasty distortion that is hard or impossible to remove later.
Pop Filter & Distance
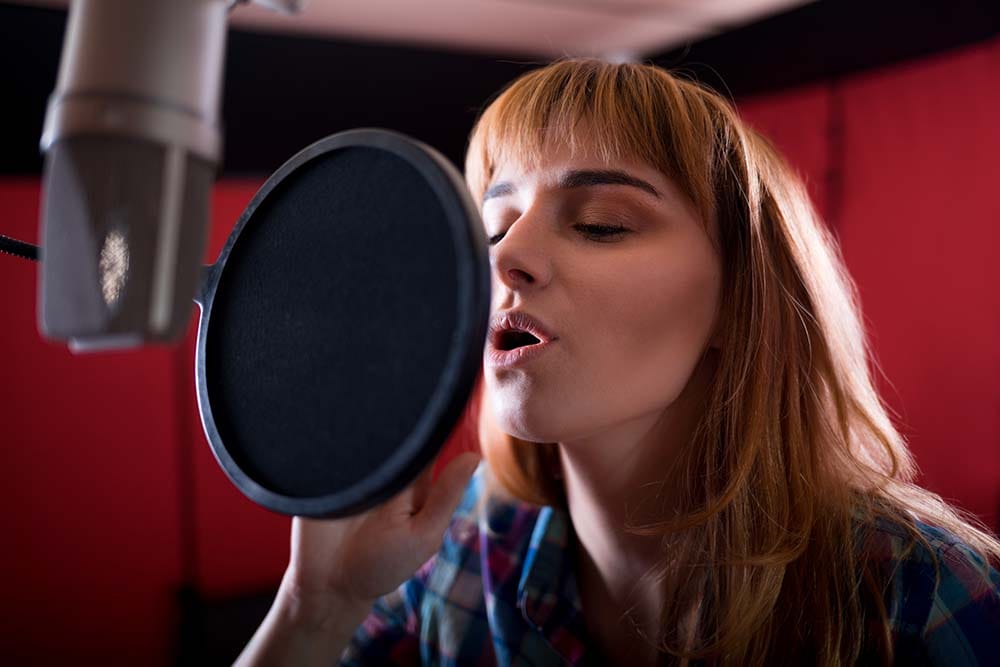
Position a pop filter 4–6 inches away from your microphone to eliminate harsh "P" and "B" plosive thumps.
A pop filter will help to soften the impact at the microphone for those plosive syllables where we naturally expel a burst of air.
By making small adjustments like this, you will save yourself lots of headaches later in the mix. It's no fun to have to fix hard vowel sounds like this after the recording is already done.
How to Structure a Song
At this point, you might have a couple of bars of the song put together - maybe eight or sixteen bars. So, how do you go from that to a full song?
Before I explain some different song section types, if this is your first song then skip this for now. That's right - skip it and go to Step 6. It is far more important that you get your first song concept taken through to the end instead of getting stuck in a mental whirlpool of trying to make it better and better and better.
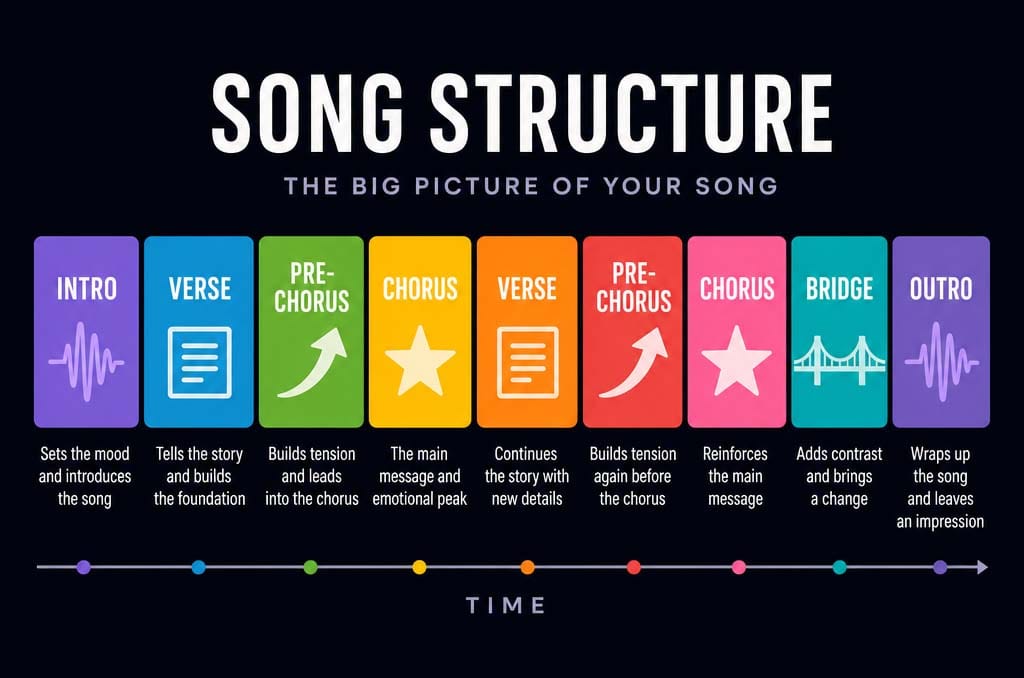
In order to take an 8-bar 'loop' into a complete song, you need to think in song sections. Let's take a look at six core song sections:
Intro
The journey is starting - the intro takes us from the silence before a song plays and opens the door to the emotional story arc that is about to happen.
Verses
The storytelling of a song happens inside the verse. This is normally a very lyrical part of the song. If there are multiple verses, they will continue the story as the song progresses. Normally, the verse sections have a lower energy than the chorus sections.
Pre-Chorus
The pre-chorus song section normally acts as a ramping up of energy that sets up the higher-energy chorus section. This is a way to build some tension. The pre-chorus is commonly found in between the verse and chorus sections.
Chorus
This is the star of the show. The chorus is the big moment and typically the highest energy point of a song. This chorus typically also has some kind of lyrical hook that is repeated. If the verse is the storytelling, then the chorus is like the moral of the story.
(Note: with EDM, the actual highest energy point of the song is the Drop, which is typically instrumental-only. In this genre, the peak normally comes after the chorus.)
Bridge
A bridge is a contrasting section that is introduced to keep the song from feeling repetitive. Imagine if you heard back-to-back chorus sections - that could get pretty old fast. To mix things up, you might use a bridge between those two chorus sections.
Typically, the bridge has good energy, but not as much as the chorus sections. Here is where you could introduce a rhythmic or melodic variation.
Outro
This is it - the end of the line. The song is coming to an end - will it end with a bang or a quiet introspective moment? Will the song fade out as a chorus is repeated or will it have some other kind of moment to wrap up?
Building Your Song Structure
As you look to use these sections, think of them like stops along the emotional journey of your song. Some are more exciting than others, but the contrast between them creates a more memorable journey overall. Here is a graphical example of how you might put song sections together into a complete song.
Keep in mind that this is just an example and you can switch the order of these song sections as you see fit. Want a bridge in the middle of the song? No problem. What about starting with a chorus instead of an intro or verse? Try it out. Don't want any Pre-Chorus sections? Drop 'em.
The key here is fulfilling the emotional journey of the song to be true to your vision.
Step 6: Mixing Basics (Making Your Track Sound Clean)
You’ve got a melody, chords, a bassline, drums, and maybe a vocal track. Right now, things might sound a little crowded or unpolished. That’s completely normal - that is what production is all about: laying down ideas but not lining them up so they are necessarily balanced against one another. And that brings us to the mixing phase.
When you're starting out, learning how to handle levels, balance, and spatial placement is far more important than loading up complex processing chains. And that is exactly what making your mixes sound better is all about.
Good news, though - at this stage, you only need to focus on four simple moves:
Volume Balancing (The Fader Mix)
Pull every track's volume fader down to zero. Bring your lead melody up to a comfortable level. Now, slowly bring up the bass, chords, kick, snare, and percussion one by one, balancing them around that lead anchor.
This is the initial stage of the mix: getting the relative volume of each track to make sense next to one another.
When everything is balanced, it is time to move on to placement on the soundstage.
Stereo Panning
Don't leave every element stacked directly in the center of the stereo field! That's the fast track to a sonic train wreck as your listener's brain struggles to decipher where all that sound is actually coming from.
Keep your kick drum, snare, sub-bass, and main lead vocal panned dead center. Then pan your rhythm chords, hi-hats, or secondary melodies slightly to the left or right (20% to 50%) to open up a wide, 3D soundstage.
You will probably tweak this a few times to get it feeling right, so don't worry about that.
Reverb for Space
Send a small touch of your lead vocal, snare, or synth melody to a shared Reverb return track to give your separate elements a cohesive sense of shared physical space.
With the right amount of reverb, your balanced and panned tracks should start coming together with a better sense of space.
(Pro Tip: Go lighter on the reverb than you think you should, because one beginner mistake is washing out the mix with a pile of 'verb.')
Master Bus Glue & Loudness
Drop a gentle limiter or bus compressor on your Master Output channel. You don't need heavy processing here - just catch the occasional loud peak and bring the overall volume up slightly so your track plays back at a competitive, comfortable listening level without clipping into the red.
If all of this was done correctly, you should have a solid rough mix for your song.
Step 7: Exporting Your First Track & Finishing
Congratulations! You have officially written, arranged, and mixed a song! Don't worry about getting all this stuff perfect - focus on getting it done.
The final step is getting it out of your DAW so you can play it in the car, listen on your phone, or share it with friends.
How to Export / Bounce Your Song
When you are going to render your song (bounce, export, etc. = render your mix to a single music audio file), you are on the home stretch. Check these last three items and you'll be on your way:
Set Your Loop Markers
Highlight the exact timeline area from the very start of bar 1 (or whatever bar you started on in your DAW) to a couple of seconds past the final note (to allow reverb and delay tails to fade out naturally).
This is your rendering range.
Master Channel Check
Look at your Master Output channel meter while playing the loudest part of the song. Make sure your master meter isn't turning red (clipping). Keep your peaks around -1 dB with your master limiter engaged.
(Clipping can cause unwanted distortion.)
Choose Your File Formats
Decide which file format(s) you are going export:
WAV (Uncompressed Audio): Export a high-quality 24-bit / 48 kHz WAV file. This is your master archival file.
MP3 (Compressed Audio): Export a 320 kbps MP3 for quick casual listening or messaging to friends. (Note: mp3s are not a 'lossless' form of rendering your track, but their file sizes are much smaller for sharing.)
Overcoming Overthinking: The "Done is Better Than Perfect" Rule
New producers often ask: How long does it take to write a song? The truth is that a song can take anywhere from two hours to two weeks or more. But if you spend three months tweaking the same 8-bar loop, you aren't refining a track - you're just hiding from the fear of finishing. That's being stuck in the mental tar pit of chasing perfection instead of finishing and moving on.
Accept right now that your first song isn't going to win a Grammy®, and that is completely fine! Its job is to teach you the process. Finishing a "good enough" song today teaches you ten times more than endlessly obsessing over a "perfect" unfinished draft for six months.
Export the file. Mark it complete. Celebrate the win. Build great habits.
Frequently Asked Questions
Do I need to know music theory to write my first song?
No, you do not need to read sheet music or know advanced music theory to write a great song. Most modern producers use basic chord formulas inside their DAW's piano roll or rely on their ear to write melodies.
Does it help to know some music theory? Of course. That theory knowledge normally helps to speed up your workflow, but zero experience is required to start.
How long does it take a new producer to write a song?
For a new producer, writing and arranging a basic 2-to-3-minute track typically takes between 3 to 10 hours spread over a few sessions. The key is avoiding perfectionism on your first track - finishing a "good enough" song quickly teaches you far more than spending months tweaking a single 8-bar loop.
Longer songs normally take more hours, just like any other project.
Can I write a song using only free software and stock plugins?
Absolutely. Every major DAW comes with high-quality stock drum kits, virtual synths, and processing tools capable of producing release-ready music. You do not need to purchase third-party plugins or sound packs when you are just getting started.
In fact, it is often better to get to know your DAW tools before purchasing extras. That way, you will know exactly what you need instead of buying things that may have less value later on.
What is the easiest instrument to start writing music with?
A basic virtual piano or synth pad inside your DAW is the easiest starting point. Because a piano keyboard visually maps out all high and low pitches from left to right, it makes drawing notes and building simple 3-note chords much more intuitive for beginners than a guitar fretboard.
Now, if you already know how to play a different instrument then lean into that when possible.
Where to Go Next
First, take a moment to appreciate what you just accomplished. You bypassed the blank screen, wrote a melody, built supporting harmony, locked in a drum groove, mixed it down, and exported a real audio file. You are no longer just someone who wants to make music - you are a producer. And that is a win!
The secret to getting ridiculously good at music production isn't a secret at all: it's doing reps. The faster you repeat this 7-step assembly line, the more natural every stage of the process becomes.
Now that you have your first song under your belt, here are your immediate next steps to level up your workspace and craft:
1. Build Out Your Studio Setup: If working through this process has lit a fire inside you to make music, it may be a good time to think about the essential gear you might need for home music production.
2. Elevate Your Composition & Songwriting: Why not take your song writing skills up a notch by learning some more refinements to the steps described here.
3. Download Your Complete Blueprint: You've made a song, but where do you go from here? Simple - grab the 35-page, step-by-step roadmap that takes you from raw DAW idea to finished master in the free Embervane Sparkflow Map and keep your sessions structured for success.
And when you're ready to up your MIDI instrumentation game, jump straight into our free MIDI Madness Tier 1 course.
Now go open up a fresh DAW project file and go make your next song!
Found this guide helpful?
Spread the word and share with another creator.
Return to How to Start Making Music on Your Computer Topic Hub
About the Author

Jim is the creator of Embervane - a lifelong music maker with a curiosity‑driven approach to creativity and learning. He has been playing drums since age nine and composing seriously since 2018, continually refining his craft through study, experimentation, and hands‑on practice.
With a background in chemistry and more than two decades of studying behavioral psychology, Jim brings a unique blend of scientific thinking and human understanding to music education. He beta‑tests tools for companies like Mastering the Mix, Kit Plugins, and Soundiron, which keeps him close to the evolving landscape of modern production.
Jim isn’t a celebrity producer or award‑winning engineer - he’s a creator who remembers exactly what it feels like to struggle, learn, and grow. His mission is to help other music makers build clarity, confidence, and momentum in their craft.
Jim is the creator of Embervane - a lifelong music maker with a curiosity‑driven approach to creativity and learning. He has been playing drums since age nine and composing seriously since 2018, continually refining his craft through study, experimentation, and hands‑on practice.
With a background in chemistry and more than two decades of studying behavioral psychology, Jim brings a unique blend of scientific thinking and human understanding to music education. He beta‑tests tools for companies like Mastering the Mix, Kit Plugins, and Soundiron, which keeps him close to the evolving landscape of modern production.
Jim isn’t a celebrity producer or award‑winning engineer - he’s a creator who remembers exactly what it feels like to struggle, learn, and grow. His mission is to help other music makers build clarity, confidence, and momentum in their craft.


©2026 Embervane LLC. All rights reserved. Embervane™ is a trademark of Embervane LLC.