
How to Set Up Any DAW for the First Time (Templates, Audio Settings, and More)
Fire Up the Engine!
You finally took the plunge. You installed your Digital Audio Workstation (DAW), opened it up for the very first time, and... you're staring at a dark screen full of blank grids, empty meters, and cryptic preference menus.
You hit a key on your keyboard or speak into your microphone, and nothing happens. Or worse, you hear a stuttering, crackling noise accompanied by a weird delay that makes making music feel impossible.
Don't panic! Every single music producer has stood right where you are standing right now.
Getting started in music production isn't just about picking software - it's about getting that software configured properly so it becomes an extension of your creative mind. As I outlined in my foundational guide on how to start making music on a computer, your DAW is the central engine of your home studio. If the engine isn't tuned before you hit the gas, you'll spend more time troubleshooting technical glitches than actually writing songs.
The good news? While DAWs like Ableton Live, Logic Pro, FL Studio, Reaper, and Fender Studio Pro (formerly Studio One) look completely different on the surface, they all operate on the exact same core digital audio principles under the hood.
In this guide, I’m going to walk you through how to set up any DAW for the first time. I'll translate the confusing audio jargon, dial in your audio interface settings, eliminate lag, organize your file storage, and build a customized starter template so you can jump straight into making music without technical friction.
Let's fire it up!
Prefer to watch or listen? Check out the video below, or continue reading below for the full deep-dive guide.
The "Rosetta Stone" of DAW Terminology
Before we open preference windows, let me share a secret that will save you hours of confusion: DAW software developers love using different names for the exact same thing.
If you watch a tutorial online made in Logic Pro, but you are using FL Studio or Ableton, it's easy to feel like they are speaking a completely different language. They aren't! They are just using different labels for universal concepts.
Here is a quick "Rosetta Stone" to help you translate settings across major DAWs. I will present the DAW-specific term and then the universal concept it relates to for four major DAWs. If your DAW is one of these, focus on that one.
Ableton Live
Audio Driver Link = Audio Device (found in Preferences > Audio)
Audio Plugin (Effects) = Audio Effects (in the Browser)
Virtual Instrument = Instruments or VST / Audio Unit Plugins
Main Timeline View = Arrangement View (toggled with Tab)
Loop / Clip Performance View = Session View (toggled with Tab)
MIDI Note / Piano Roll View = MIDI Note Editor (in the lower Clip View panel - toggle with Shift-Tab)
Mixing Fader View = Mixer Controls (embedded in Session View or folded in Arrangement)
Audio Waveform Inspector / Zoom View = Sample Editor (in the lower Clip View panel - - toggle with Shift-Tab)
Audio Buffer Setting = Buffer Size
Fender Studio Pro (Studio One)
Audio Driver Link = Audio Device (found in Options > Audio Setup)
Audio Plugin (Effects) = Effects (in the Browser)
Virtual Instrument = Instruments (in the Browser)
Main Timeline View = Arrange View (or Song Page)
Scratchpad / Alternate Arrangement View = Scratch Pad
MIDI Note / Piano Roll View = Piano View (inside the Note Editor; toggled with F2)
Mixing Fader View = Console (toggled with F3)
Audio Waveform Inspector / Zoom View = Audio Editor (inside the Edit View; toggled with F2)
Audio Buffer Setting = Device Block Size
Logic Pro (macOS)
Audio Driver Link = CoreAudio Device (found in Settings > Audio)
Audio Plugin (Effects) = Audio Unit (AU) Effects
Virtual Instrument = Software Instruments (or AU Samplers/Synths)
Main Timeline View = Tracks Area
Loop / Clip Performance View = Live Loops grid
MIDI Note / Piano Roll View = Piano Roll Editor (toggled with P)
Mixing Fader View = Mixer (toggled with X)
Audio Waveform Inspector / Zoom View = Audio Track Editor / Audio File Editor (toggled with E)
Audio Buffer Setting = I/O Buffer Size
FL Studio
Audio Driver Link = Audio Device (found in Options > Audio Settings)
Audio Plugin (Effects) = Effect Plugins (loaded in Mixer inserts)
Virtual Instrument = Generator Plugins (or VST / Fruity Instruments loaded in Channel Rack)
Main Timeline View = Playlist (toggled with F5)
Loop / Pattern Builder View = Channel Rack (toggled with F6)
MIDI Note / Piano Roll View = Piano Roll (toggled with F7)
Mixing Fader View = Mixer (toggled with F9)
Audio Waveform Inspector / Zoom View = Audio Clip Editor / Edison / Sample Properties
Audio Buffer Setting = Buffer Length
Use Your DAW Maker's Support Resources
While this guide teaches you the universal principles behind what settings to choose and why, every DAW places these menus in slightly different sub-folders.
Do yourself a huge favor right now: bookmark the official YouTube channel or support documentation page for your specific DAW. Companies like Ableton, Image-Line (FL Studio), Presonus, and Apple publish fantastic 2-minute "quick-start" videos showing the exact menu clicks for their specific interface layouts.
Use this guide to understand the strategy, and use your DAW provider's official support videos for the specific button clicks.
I cannot stress this enough - spending just a little time going through these well-prepared videos and instructions will get you up to speed so much faster than fiddling around on your own. Remember: the people that made that DAW want you to succeed.

Audio Drivers: Getting Sound In and Out
The very first screen you should open when installing a DAW is the Audio Preferences window. This tells your software how to talk to your computer's sound card or your external audio interface.
If you don't configure this correctly, you will either get dead silence, distorted audio, or sound coming out of your computer's tinny internal speakers instead of your studio headphones or monitors.
Selecting the Right Audio Driver
Getting set up right means setting the correct audio driver.
On macOS (Apple): Mac computers use a built-in system called CoreAudio. It works brilliantly right out of the box. Simply select your audio interface (or "Built-In Output" if you are working purely on headphones) as your Input and Output device.
On Windows (PC): Windows audio can be a bit trickier. For low-latency recording and pristine audio quality, you want to use an ASIO driver. You may see other drivers listed, but ASIO is typically the one that will serve you best. Be warned, however - ASIO is a jealous thing and does not like to share audio control between multiple programs that might want to use your audio services (like a streaming or video conference software).
If you own an external audio interface (like a Focusrite Scarlett, Audient iD, or Universal Audio Volt), download and install the official manufacturer's ASIO driver from their website. Select that driver inside your DAW preferences.
If you do not own an audio interface yet, select FL Studio ASIO or ASIO4ALL. Avoid standard "MME" or "DirectSound" drivers, as they introduce terrible lag!
Assigning Inputs and Outputs
Once your driver is selected, ensure your Input Device is set to your microphone/interface inputs and your Output Device is set to the headphone jack or main speaker outputs of your interface.
Buffer Size & Latency: The Great Balancing Act
Have you ever tapped a key on your MIDI controller or spoken into a microphone, only to hear the sound come out of your headphones a fraction of a second later?
That annoying delay is called latency.
Latency is a lag that happens because your computer needs a tiny split-second to collect incoming digital audio data, process it through plugins, and calculate the output signal. Plugins and instruments can progressively add latency - some that take a lot of CPU horsepower can add tremendous amounts just by themselves!
The setting that controls this latency delay is called your Buffer Size. Think of your buffer as an assembly line bucket. Your computer fills the bucket with audio data before dumping it out to your speakers:
A Small Buffer (64 to 128 Samples): The computer uses a tiny bucket. It empties the bucket rapidly, resulting in near-zero latency. This feels instantaneous when playing keys or recording vocals! However, because the computer has to empty the bucket constantly, it places a heavy strain on your CPU.
A Large Buffer (512 to 1024+ Samples): The computer uses a large bucket. It takes longer to fill and dump, resulting in noticeable latency (lag). However, because the computer has time to relax between dumps, it gives your CPU massive headroom to run heavy plugins and dozens of audio tracks.
With this dance, remember this:
Low Buffer = Low Latency = High CPU Load (Best for Recording - keep the plugins off!)
High Buffer = High Latency = Low CPU Load (Best for Mixing - pile on the plugins!)
(Why isn't latency a "bad thing" when you are mixing? Because everything is being processed at the same time, so you still hear things without the delay most of the time. Recording is the key time when you want time-accurate results, so keep the latency low then. However, if you stack enough plugins into your tracks, you can create a playback latency where the sound lags your DAW's playhead location.)
The Rule of Thumb for Buffer Settings
You shouldn't leave your buffer size at one static number forever. Instead, toggle it based on what phase of production you are in:
When Recording / Tracking (Vocals, MIDI, Instruments): Set your buffer size low - typically 64 or 128 samples (or 256 if your computer is older). This keeps performance responsive so you feel zero lag.
When Mixing & Editing: Once the live performance is finished and you are adding heavy synth plugins, EQ, reverb, and compression, flip your buffer size up to 512 or 1024+ samples. This prevents pops, clicks, and CPU overload errors.
Note: Different DAWs may handle CPU loads differently. If you pile a bunch of plugins on a single track in one DAW, it may spike the CPU utilization faster than if those plugins were spread across multiple tracks.
Typically, this is not an issue, but if you find that you are running into a particular bottleneck around CPU utilization in the future then you will either need to freeze your tracks as you work, dig into how your DAW handles track-level plugin usage, or consider switching to a different DAW that handles these things better.
Sample Rate & Bit Depth: Setting Up Audio Quality
Right next to your buffer settings in your DAW preferences, you will see options for Sample Rate and Bit Depth. These dictate the digital resolution of your recorded audio.
It can be tempting to slide these numbers all the way to the maximum settings thinking "higher numbers mean better music," but overdoing this will simply devour your computer's hard drive space without providing any audible benefit to your listeners.
Why? Because the sample rate and bit depth effectively multiply together to create more and more little 'audio bits' to your final rendered song. High Sample Rate x High Bit Depth = Really Big Files. But that file size does not necessarily translate to what a human ear can hear.
What Sample Rate Should You Choose?
Sample rate measures how many times per second your system captures audio snapshots.
44.1 kHz (44,100 snapshots/sec): The historical standard for CD audio and consumer streaming services like Spotify and Apple Music.
48 kHz (48,000 snapshots/sec): The modern standard for video, film, streaming platforms, and professional audio production.
Recommendation: Set your DAW sample rate to 48 kHz (or 44.1 kHz if you need to). Avoid 96 kHz or 192 kHz when starting out - they quadruplicate your file sizes and choke your CPU for audio detail that human ears can rarely detect in a home studio environment.
Avoid the flex - setting everything to 96 kHz is likely not going to help you in the end.
What Bit Depth Should You Choose?
Bit depth determines the dynamic range (the difference between the quietest and loudest sounds) your DAW can handle without distorting. If the bit rate is set incorrectly, then you can get some nasty clipping happening. Don't be scared about my earlier comment about high bit rate blowing up your file sizes here - you need to operate in the safe zone.
Recommendation: Set your recording bit depth to 24-bit. 24-bit provides a huge, forgiving dynamic range with a whisper-quiet noise floor, making it nearly impossible to accidentally distort your digital signals while tracking.
File Management: Organizing Your Projects & Samples
There is nothing more heartbreaking than opening a project you worked on three months ago, only to see a giant red error message that reads: "Missing Audio Files." Good luck remembering where those files are now, multiple projects later.
By default, many DAWs will save recorded audio clips, drum samples, and project files in random temporary folders scattered across your computer's main hard drive. If you clean out your Downloads folder later, you can accidentally destroy your songs!
Fight against this by organizing your files right from the start - you will thank me for this.
Create a Dedicated Music Production Directory
Take five minutes right now to set up a clean folder structure on your computer's hard drive or an external SSD drive. Here is an example for you:
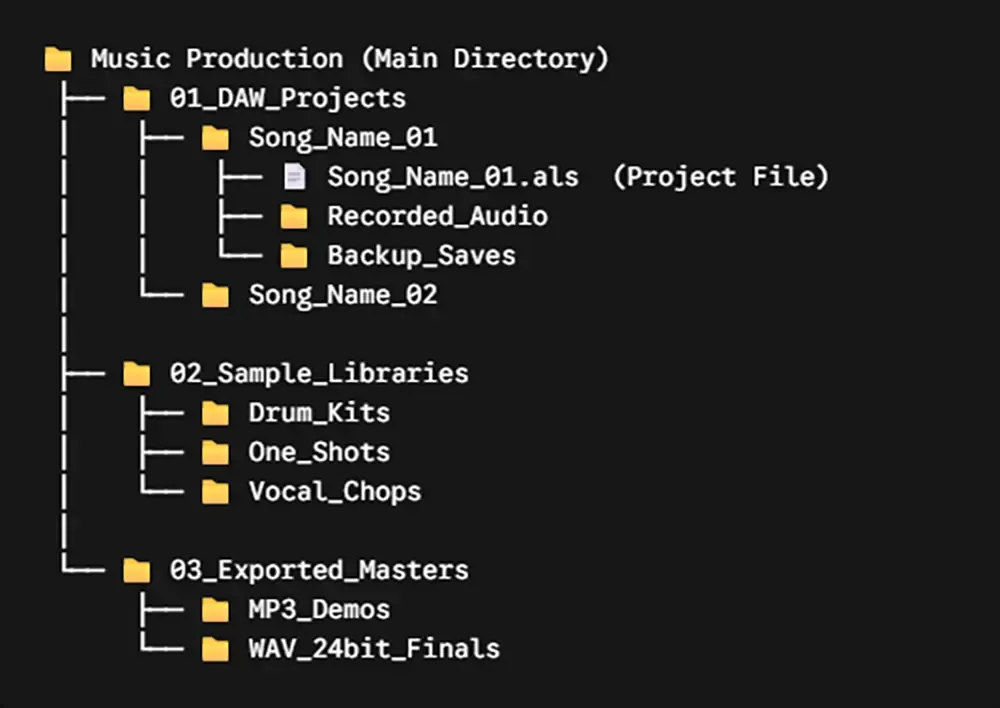
As you progress, you may find that a different structure works better for your workflow. The key here is not the specific structure, but rather having a structure that you can use efficiently.
When you are trying to produce a song, every mouse-click that isn't moving you forward is slowing you down. Keep your file system efficient and you will save tons of time.
Consider "Collect All and Save"
When saving your work inside your DAW, get into the habit of using your DAW's complete archiving feature (for example, Collect All and Save in Ableton Live, or Save Project with Assets in Logic and Studio One).
This forces your DAW to copy every external drum sample and recorded vocal clip directly into that specific song's folder, ensuring your project remains 100% intact even if you move the files to another computer years down the road.
It may take a little extra hard drive space, but this is a great way to stay organized, especially if you ever find yourself going back to projects or sending project folders to a different computer.
Build Your Default Starter Template
Imagine sitting down at your desk with an incredible song idea in your head. You fire up your DAW, and... you have to spend the next 15 minutes manually creating drum tracks, adding virtual instrument tracks, setting up bus routes, and assigning color coding before you can record a single note.
By the time you finish building the project layout, your creative spark is dead.
This is why building a Default Starter Template is one of the single greatest productivity hacks in home music production.
What Should Be in Your Starter Template?
A template is simply a pre-configured project file that opens automatically whenever you start a new song. Keep it clean, lightweight, and versatile:
4 to 8 Standard Tracks
1 x Drum / Beat Track (Sampler or Drum Rack)
1 x Bass Track (Simple Synth or 808 plugin)
2 x Keys / Chords Tracks (Piano, Electric Piano, or Pad synths)
1 x Lead / Melody Track
1 x Vocal / Audio Input Track (Pre-routed to your audio interface input)
Color Coding & Naming
Name your tracks clearly (Drums, Bass, Chords, Vocal, etc.) and assign distinct colors to each instrument group so your eyes instantly recognize the arrangement. The colors are yours - keep them consistent and it will speed up your workflow.
Master Bus Utility Plugins
Add a clean spectrum analyzer plugin and or volume/loudness meter (like the free dpMeter5 by TBProAudio) on your Master Output channel so you can monitor your overall volume levels from second one.
Lock that Template in Place
Once you have this blank canvas set up and organized to taste, go to your DAW's file menu and select "Save Project as Default Template." Now, every time you open your software, your home studio is powered up and ready for immediate inspiration!
And if you ever decide that you want to tweak that template, just load the blank one fresh and make your modifications. Then Save Project as Default Template once again and boom - you are ready to go.
Using Other Templates
While your DAW will have a Default Template, you can also use templates for other tasks like recording, mixing, or mastering. You might even develop genre-specific templates for your music production work. If you save a template, you can load it later in your DAW and get to work. It might take an extra mouse-click or so, but you can save massive amounts of time across your years working with music.
Master the Core Universal Keyboard Shortcuts
Mouse-clicking through dropdown menus to stop, start, record, or split audio clips slows down your brain. Learning just a handful of universal keyboard shortcuts will double your production speed within a week.
Customized hotkeys exist for every program, and you should take regular time each week to learn a new one or two as they greatly increase your efficiency. But these fundamental commands are nearly universal across all major DAWs - you should get these locked in first:
Windows Shortcuts
Play / Stop = Spacebar
Rewind = Left Arrow
Fast Forward = Right Arrow
Loop Selection = Ctrl + L
Record = R (or NumPad *)
Undo = Ctrl + Z
Redo = Ctrl + Y
Save Project = Ctrl + S
Duplicate Selection = Ctrl + D
Solo Track = S
Mute Track = M
macOS Shortcuts
Play / Stop = Spacebar
Rewind = Left Arrow
Fast Forward = Right Arrow
Loop Selection = Ctrl + L
Record = R (or NumPad *)
Undo = Cmd + Z
Redo = Cmd + Shift + Z
Save Project = Cmd + S
Duplicate Selection = Cmd + D
Solo Track = S
Mute Track = M

Commit these to muscle memory early. The less you have to think about where your hands are moving on the keyboard, the more energy you have to focus on the music!
Then, take a little time to see what kind of keyboard shortcuts in your DAW can speed you up even further. Pay attention to things you are doing with the mouse frequently and then check out those keyboard shortcut bindings to see if one exists or you can add one yourself.
Frequently Asked Questions
What sample rate and bit depth should I use for music production?
You should set your DAW sample rate to 48 kHz (or 44.1 kHz) and your bit depth to 24-bit. This combination provides professional audio quality and excellent dynamic range without unnecessarily draining your computer's CPU or filling up your hard drive with massive files.
What is buffer size and how does it affect audio latency?
Buffer size controls how much audio data your computer processes before sending it to your speakers. A low buffer size (64 to 128 samples) eliminates latency for recording but increases CPU strain. A high buffer size (512 to 1024+ samples) causes latency but frees up CPU power, making it ideal for mixing with heavy plugins.
Should I use ASIO or CoreAudio drivers for my DAW?
If you are using a Mac, you should use Apple's built-in CoreAudio driver. If you are on a Windows PC, you should select an ASIO driver (either from your audio interface manufacturer or ASIO4ALL) to ensure pristine audio quality and low-latency recording.
Why should I create a default starter template in my DAW?
Building a default starter template saves time and preserves your creative momentum. By pre-loading your essential tracks, instrument groups, master bus plugins, and color-coding, you eliminate technical setup and can start writing music the second you open your software. Using DAW templates is an excellent way to speed up your workflow.
Where to Go Next
1. Dial In Your Audio Preferences: Open your DAW right now, select your driver, set your sample rate to 48 kHz (or 44.1 kHz), and test your headphones.
2. Consult Your DAW's Official Video Channel: Search YouTube or your software manufacturer's support site for "Official [Your DAW Name] Beginner Audio Setup" to verify the exact menu locations for your specific software.
3. Download the Production Roadmap: Configuring your DAW is step one of the physical production setup. To see how tracking, arranging, mixing, and mastering fit together across the full creative process, download my free 35-page Embervane Sparkflow Map.
4. Verify Essential Home Music Studio Gear: Get a list of the essential gear needed for a successful home music studio and compare what you have to what you may need.
And when you're ready to plug in your controller and power up your MIDI game, jump straight into our free MIDI Madness Tier 1 course.
Now that your engine is tuned and ready, fire up your DAW, load your template, and let's make some noise!
Found this guide helpful?
Spread the word and share with another creator.
Commit these to muscle memory early. The less you have to think about where your hands are moving on the keyboard, the more energy you have to focus on the music!
Then, take a little time to see what kind of keyboard shortcuts in your DAW can speed you up even further. Pay attention to things you are doing with the mouse frequently and then check out those keyboard shortcut bindings to see if one exists or you can add one yourself.
Return to How to Start Making Music on Your Computer Topic Hub
Previous Topic <
> Next Topic
About the Author

Jim is the creator of Embervane - a lifelong music maker with a curiosity‑driven approach to creativity and learning. He has been playing drums since age nine and composing seriously since 2018, continually refining his craft through study, experimentation, and hands‑on practice.
With a background in chemistry and more than two decades of studying behavioral psychology, Jim brings a unique blend of scientific thinking and human understanding to music education. He beta‑tests tools for companies like Mastering the Mix, Kit Plugins, and Soundiron, which keeps him close to the evolving landscape of modern production.
Jim isn’t a celebrity producer or award‑winning engineer - he’s a creator who remembers exactly what it feels like to struggle, learn, and grow. His mission is to help other music makers build clarity, confidence, and momentum in their craft.
Jim is the creator of Embervane - a lifelong music maker with a curiosity‑driven approach to creativity and learning. He has been playing drums since age nine and composing seriously since 2018, continually refining his craft through study, experimentation, and hands‑on practice.
With a background in chemistry and more than two decades of studying behavioral psychology, Jim brings a unique blend of scientific thinking and human understanding to music education. He beta‑tests tools for companies like Mastering the Mix, Kit Plugins, and Soundiron, which keeps him close to the evolving landscape of modern production.
Jim isn’t a celebrity producer or award‑winning engineer - he’s a creator who remembers exactly what it feels like to struggle, learn, and grow. His mission is to help other music makers build clarity, confidence, and momentum in their craft.


©2026 Embervane LLC. All rights reserved. Embervane™ is a trademark of Embervane LLC.